

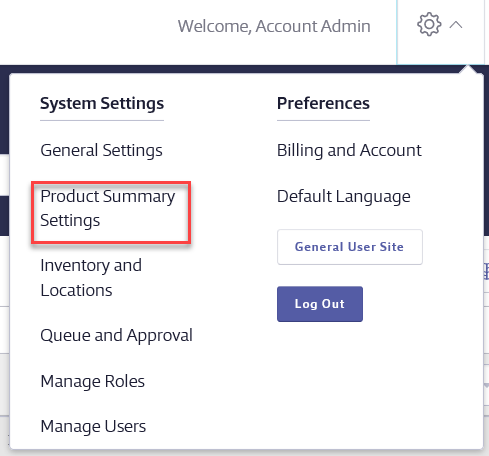
Product Summary Settings
To access the Product Summary settings, click on the Settings menu in the upper right-hand corner and select Product Summary Settings.
The Product Summary settings section of your account allows Account Administrators and Administrators the ability to adjust the fields and options available on the Product Summary page. This includes:
- Adjusting banned chemical options
- Adjusting the Share feature behavior
- Managing account-wide ingredient, manufacturer, and product data details
- Selecting which fields and product data modules are available
- Editing and translating custom fields
Changes you make in the Product Summary settings affect all products in your account.
Note that not all account types have access to all options in Product Summary settings. Additionally, your options may vary depending on your account permissions.
Banned Chemicals
Available to SDS and SDS/Chemical Management accounts only
By default, if you use the Master Chemical List to mark an ingredient as banned, any product in which you index that ingredient will automatically be marked as banned. See Managing and Banning Chemicals using the Master Chemical List for more information on banning ingredients.
If you prefer to always manually mark a product as banned, you can select No, I’d like the banned flag to be added to products on a manual basis. See Banning Products for more information on banning products.
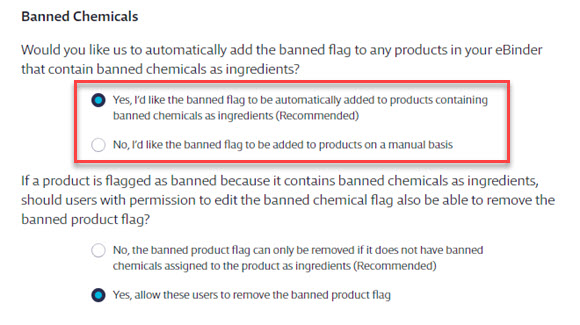
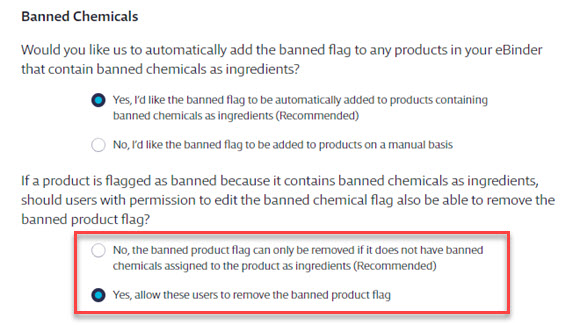
Once a product is marked as banned due to indexing a banned ingredient, users may or may not be able to remove the banned flag from the product depending on which setting you choose in this section. If you want users to be able to remove the banned flag without removing the ingredient, select the second option. Additionally, the user will need to have permissions to mark products as banned. See Editing Licensed User and Role Permissions for more information.
If you make changes, be sure to click the Save Changes button on the lower right-hand side of the screen.
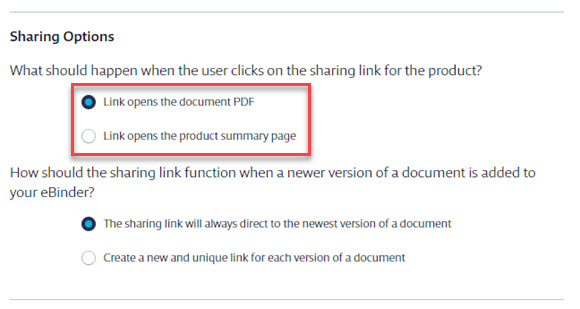
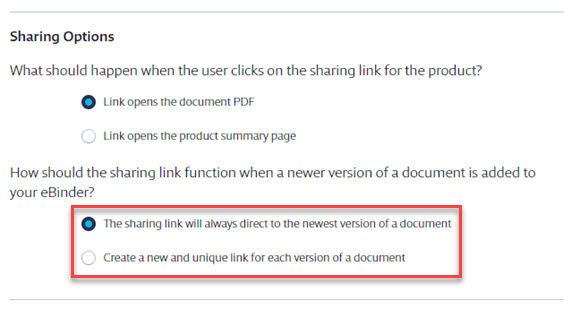
Sharing Options
Available to GM Pro, SDS and SDS/Chemical Management accounts only
These options adjust how the URL works when it’s generated by clicking the Share button from the eBinder or Product Summary.
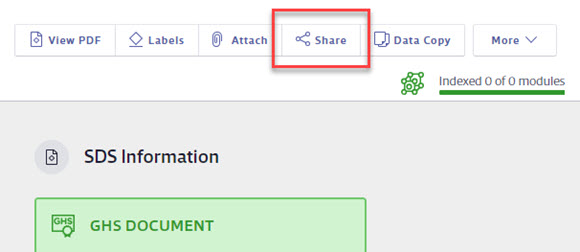
Sharing options are a great way to give someone a direct link to the safety data sheet in your eBinder. If you want the URL to open the PDF, select the first option. If you prefer the link take the end user to the Product Summary, select the second option.
By default, the URL will always point to the newest version of a safety data sheet in your eBinder. If you prefer that each version has its own URL, select the second option.
If you make changes, be sure to click the Save Changes button on the lower right-hand side of the screen.
To get a list of all the URLs for all products in your eBinder, regardless of which option(s) you select above, use the URL Link Report.
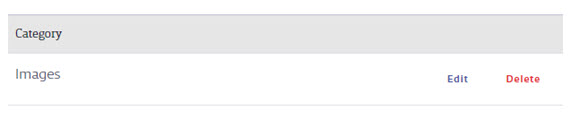
Attached File Categories
Available to GM Pro, SDS and SDS/Chemical Management accounts only
Attached File Categories allow you to easily organize any documents you choose to attach to the products in your eBinder. See Attach Files for more information.
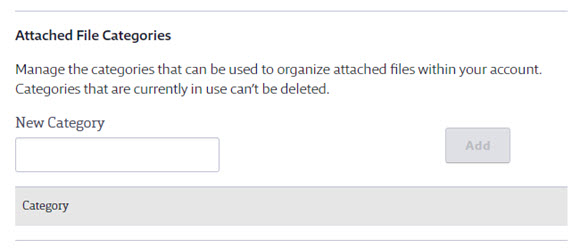
Enter the name of the category in the New Category field and click Add. For example, if you plan to attach training documentation, you could create a category called Training Documents.
Once you’ve created categories, click Edit to make changes.
Manufacturer List
The Manufacturers List section allows you to edit manufacturer names, enter vendor codes, or add the manufacturer’s URL.
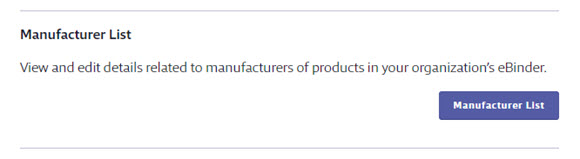
Click on the Manufacturer List button for a list of all the manufacturers for which you have products in your eBinder.
Once on the Manufacturers Settings page, click on the manufacturer name to open the summary panel. Click the Edit button to make any changes to the manufacturer.
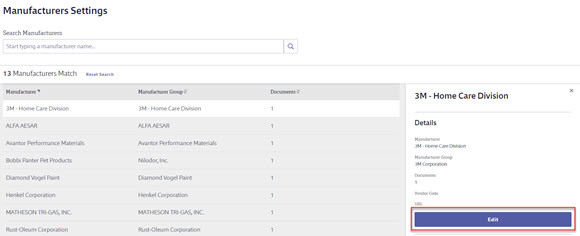
Note that any changes you make here will affect all products in your eBinder. To get a list of all manufacturers and their associated data, run the Manufacturer Contact Report.
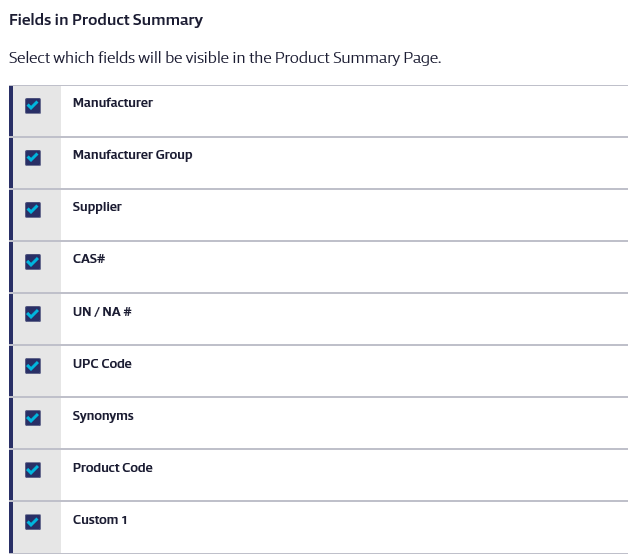
Fields in Product Summary
This section refers to which fields are visible in the Product Details, SDS Information, and Activity sections on the Product Summary page. By default, all fields are visible. VelocityEHS recommends that if you don’t plan to use a field you uncheck the box for it here. This keeps your Product Summary better organized and allows your users to more easily find the information they need.
Product Summary Modules
In this section you can enable or disable any of the available product summary indexing modules for your entire account using the checkboxes. You can change the order in which the module groups appear using the arrows on the right.
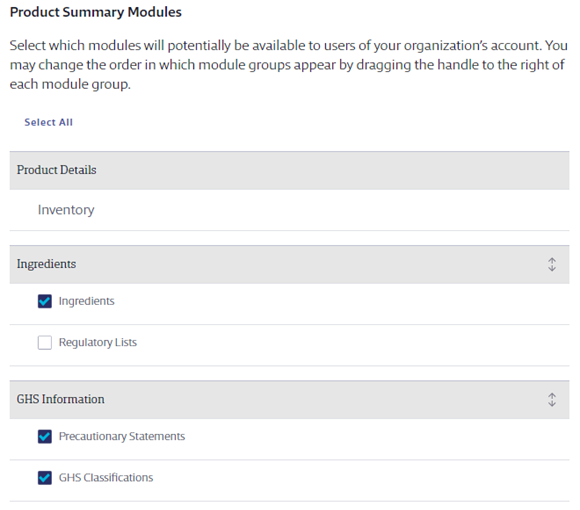
VelocityEHS recommends you enable the modules for information you know you will need to include on secondary container labels, use to generate reports or want to be able to search by. However, if you prefer, you can click Select All to enable all modules.
The Inventory module is always on and cannot be turned off or moved.
Note that enabling modules here does not turn on the modules in the Product Summary for all of your products; this only determines whether or not they are available to be selected on the Product Summary page. For more information on turning modules on in the Product Summary, see Indexing Safety Data Sheet Information.
Turning off a module does not delete any indexed information. Additionally, if you want a module to only be visible to some user roles and not others you can adjust those settings for each role. See Editing Role Permissions for more information.
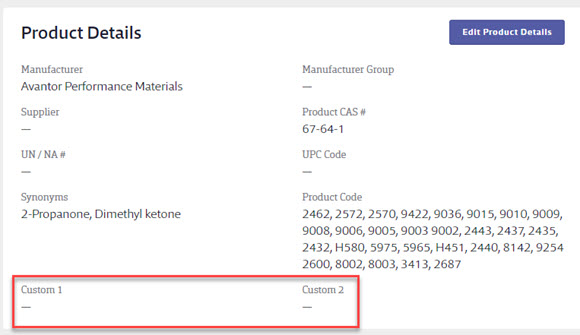
Custom Product Details Fields
There are two fields in the Product Details section of the Product Summary that you can use for entering information that your company uses to identify or track products. For example, you may have internal part numbers, specific tracking codes, or other pieces of data you want to associate with your products. The Custom 1 and Custom 2 fields are perfect for this since they hold up to 255 characters.
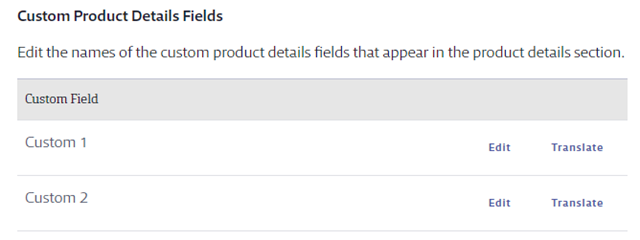
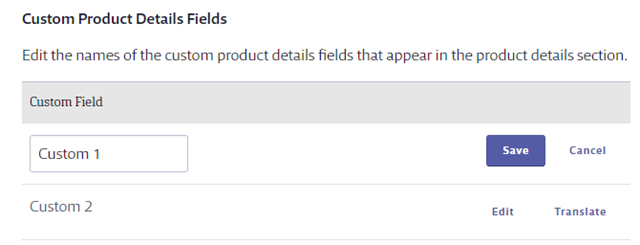
To change the names of these fields to reflect the information you put in them click on the Edit button next to Custom 1 or Custom 2, change the wording, and click Save.
If you have staff using your Chemical Management system in languages other than English,
VelocityEHS recommends you use the Translate feature to ensure they see the correct wording. Click on Translate and then use Edit to enter the correct word for the languages you need. If you do not translate the names of your fields, staff who use the system in another language will still see Custom 1 or Custom 2.
![]()
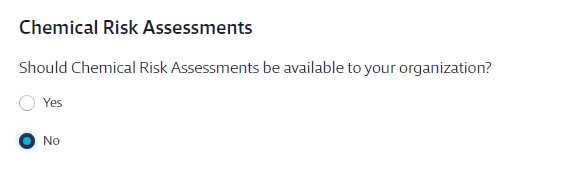
Chemical Risk Assessments
Available to SDS/Chemical Management accounts only
The Chemical Risk Assessments feature allows you to complete a Chemical Risk Assessment for products directly from your eBinder. To enable this feature select Yes. Make sure to Save your changes and then log out and back in to your account. Note that after you turn on this function for your account you need to enable it for the roles that should have access. See Manage Roles Overview for more details.
Master Chemical List
Available to SDS and SDS/Chemical Management accounts only
Your Chemical Management account comes standard with a pre-populated database of chemicals, called the Master Chemical List, which you can use when indexing ingredients for products in your eBinder. The Master Chemical List section in Product Summary Settings allows you to edit or add information about chemicals. Information you enter or edit in the Master Chemical List affects any current or future product for which you index this chemical as an ingredient.
For more information, see Managing and Banning Chemicals using the Master Chemical List.
Custom Ingredients Field
Available to SDS and SDS/Chemical Management accounts only
This field corresponds to the custom field you see when indexing ingredients for a product. The Custom Ingredients Field allows you to enter additional ingredient information specific to that product.


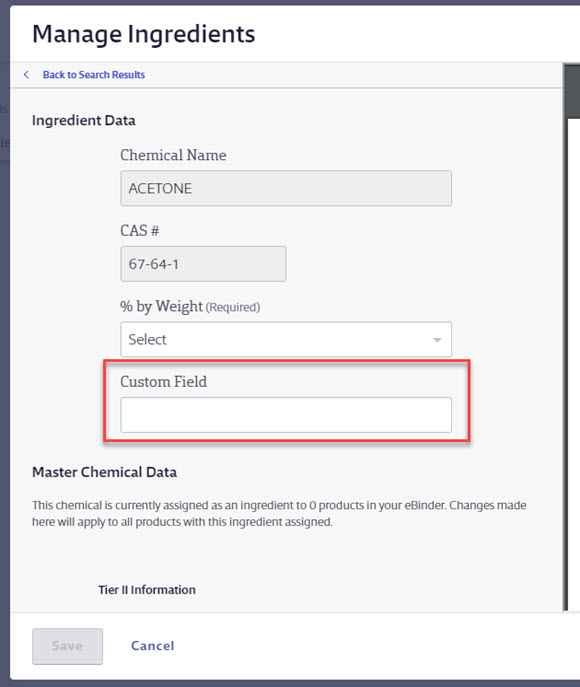
To change the name of the Custom Ingredients Field to reflect the contents of the field, click Custom Field, delete the current text, and type your text. Click Save Changes at the bottom right-hand side of the screen.
If you have staff using your Chemical Management system in languages other than English,
VelocityEHS recommends you use the Translate feature to ensure they see the correct wording. Click on Translate and then use Edit to enter the correct word for the languages you need. If you do not translate the name of your field, staff who use the system in another language will still see Custom Field as the field name.
Custom Master Chemical List Field
Available to SDS and SDS/Chemical Management accounts only
This field corresponds to the custom field you see when editing master chemical list information for an ingredient. The Custom Master Chemical List Field allows you to enter additional ingredient information that will then be shown any time you index that ingredient.
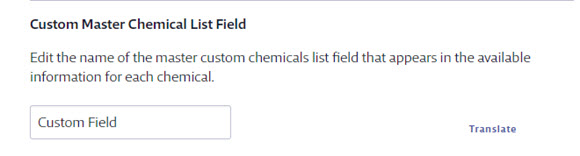
To change the name of the Custom Master Chemical List Field to reflect the contents of the field, click Custom Field, delete the current text, and type your text. Click Save Changes at the bottom right-hand side of the screen.
If you have staff using your Chemical Management system in languages other than English,
VelocityEHS recommends you use the Translate feature to ensure they see the correct wording. Click on Translate and then use Edit to enter the correct word for the languages you need. If you do not translate the name of your field, staff who use the system in another language will still see Custom Field as the field name.
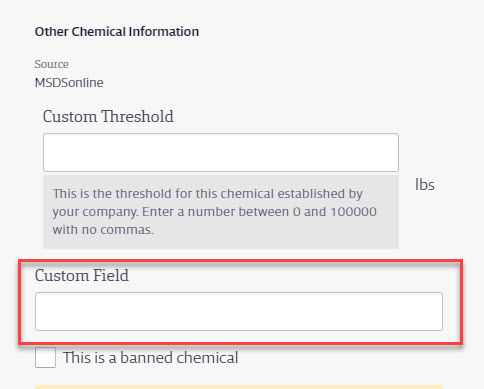
Custom Chemical Measurement Unit Field
Available to SDS and SDS/Chemical Management accounts only
This field corresponds to the label next to the Custom Master Chemical List field you see when editing master chemical list information for an ingredients. The Custom Master Chemical List Field allows you to enter specific unit of measurement for use with the data you input in the Custom Master Chemical List field.
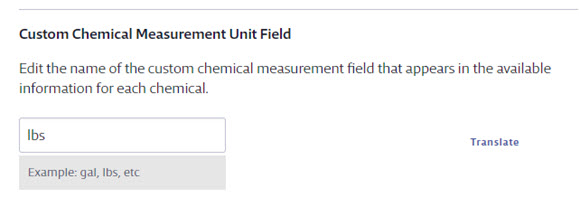
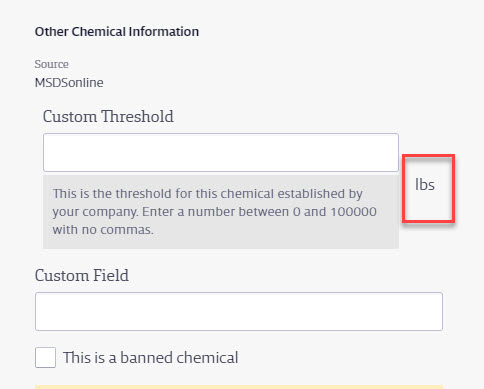
To change the wording in the Custom Chemical Measurement Unit Field, click Custom Field, delete the current text, and type your text. Click Save Changes at the bottom right-hand side of the screen. If you do not want to have a custom unit of measurement associated with the Custom Master Chemical List Field, delete the text and click Save Changes.
If you have staff using your Chemical Management system in languages other than English,
VelocityEHS recommends you use the Translate feature to ensure they see the correct wording. Click on Translate and then use Edit to enter the correct word for the languages you need. If you do not translate the name of your field, staff who use the system in another language will still see Custom Field.
Personal Protective Equipment (PPE)
Available to GM Pro, SDS and SDS/Chemical Management accounts only
When indexing PPE in the Product Summary for a product you have the option to add new PPE options that are not on the pre-populated list. See PPE Indexing for more information. You can also add additional options, as well as manage those options, in this section of the Product Summary Settings.
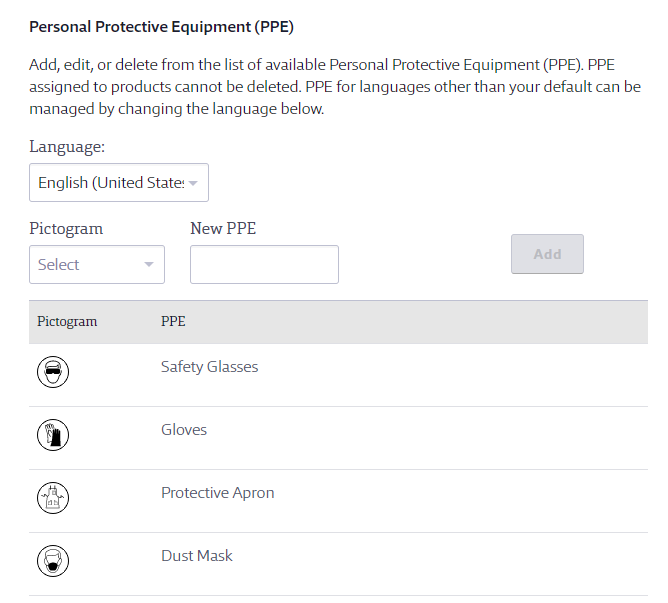
To add a new PPE option, select a pictogram that matches the PPE (optional) from the drop-down and then enter the PPE name in the New PPE field (required). Click the Add button.
If the PPE Name you entered is already in use in your account you will get a message indicating that it already exists and prompting you to enter a different name.
Any new PPE you enter will be flagged with the language selected in the drop-down menu. This means it will only appear as an option for your account when that same language is selected in the indexing module.
To edit the PPE options you’ve added, click the Edit link next to the option. Make your changes and click Save. Note that you cannot edit the pre-populated list options. Additionally, indexed PPE options cannot be deleted unless they are first removed from any products to which they are assigned.
Target Organs
Available to GM Pro, Chemical Management accounts only
When indexing Target Organs in the Product Summary for a product you have the option to add new Target Organ options that are not on the pre-populated list. See Target Organ Indexing for more information. You can also add additional options, as well as manage those options, in this section of the Product Summary Settings.
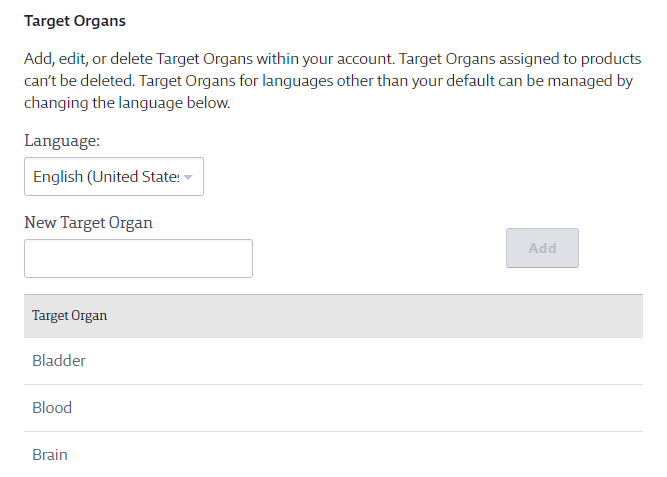
To add a new Target Organ option enter the Target Organ name in the New Target Organ field. Click the Add button.
If the Target Organ you entered is already in use in your account you will get a message indicating that it already exists and prompting you to enter a different name.
Any new Target Organs you enter will be flagged with the language selected in the drop-down menu. This means it will only appear as an option for your account when that same language is selected in the indexing module.
To edit the Target Organ options you’ve added, click the Edit link next to the option. Make your changes and click Save. Note that you cannot edit the pre-populated list options. Additionally, indexed Target Organ options cannot be deleted unless they are first removed from any products to which they are assigned.
Health Hazards
Available to GM Pro, SDS and SDS/Chemical Management accounts only
When indexing Health Hazards in the Product Summary for a product you have the option to add new Health Hazards options that are not on the pre-populated list. See Health Hazards Indexing for more information. You can also add additional options, as well as manage those options, in this section of the Product Summary Settings.
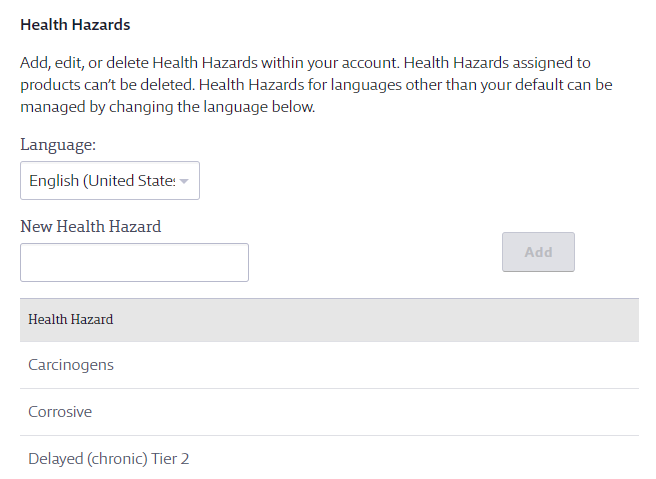
To add a new Health Hazard option enter the Health Hazard name in the New Health Hazard field. Click the Add button.
If the Health Hazard you entered is already in use in your account you will get a message indicating that it already exists and prompting you to enter a different name.
Any new Health Hazards you enter will be flagged with the language selected in the drop-down menu. This means it will only appear as an option for your account when that same language is selected in the indexing module.
To edit the Health Hazard options you’ve added, click the Edit link next to the option. Make your changes and click Save. Note that you cannot edit the pre-populated list options. Additionally, indexed Health Hazard options cannot be deleted unless they are first removed from any products to which they are assigned.
Physical Hazards
Available to GM Pro, SDS and SDS/Chemical Management accounts only
When indexing Physical Hazards in the Product Summary for a product you have the option to add new Physical Hazards options that are not on the pre-populated list. See Physical Hazards Indexing for more information. You can also add additional options, as well as manage those options, in this section of the Product Summary Settings.
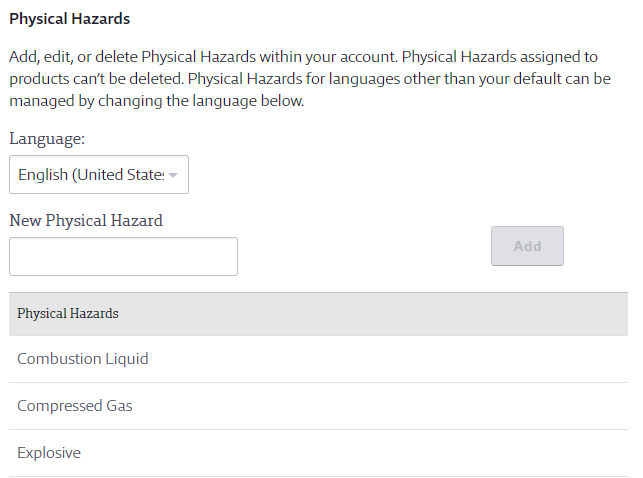
To add a new Physical Hazard option enter the Physical Hazard name in the New Physical Hazard field. Click the Add button.
If the Physical Hazard you entered is already in use in your account you will get a message indicating that it already exists and prompting you to enter a different name.
Any new Physical Hazard you enter will be flagged with the language selected in the drop-down menu. This means it will only appear as an option for your account when that same language is selected in the indexing module.
To edit the Physical Hazard options you’ve added, click the Edit link next to the option. Make your changes and click Save. Note that you cannot edit the pre-populated list options. Additionally, indexed Physical Hazard options cannot be deleted unless they are first removed from any products to which they are assigned.
Physical State
Available to GM Pro, SDS and SDS/Chemical Management accounts only
If the Physical State you need to index in the Physical Properties module is not available, you can enter it here for use when indexing. You also manage the options you add in this section of the Product Summary Settings.
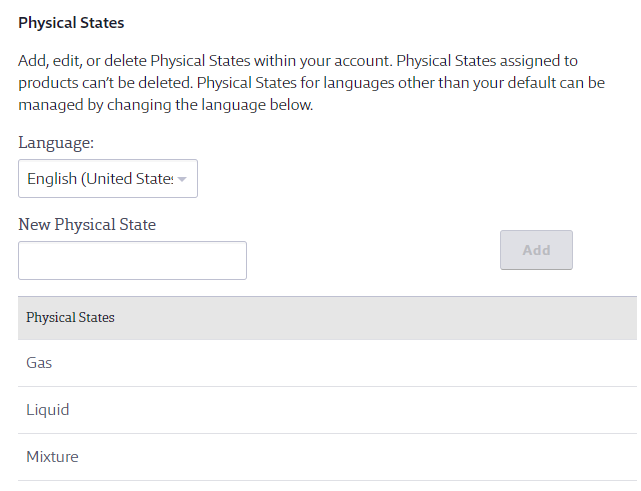
To add a new Physical State enter the Physical State name in the New Physical State field. Click the Add button.
If the Physical State you entered is already in use in your account you will get a message indicating that it already exists and prompting you to enter a different name.
Any new Physical State you enter will be flagged with the language selected in the drop-down menu. This means it will only appear as an option for your account when that same language is selected in the indexing module.
To edit the Physical States options you’ve added, click the Edit link next to the option. Make your changes and click Save. Note that you cannot edit the pre-populated list options. Additionally, indexed Physical States options cannot be deleted unless they are first removed from any products to which they are assigned.
Product Groups
See Creating and Managing Product Groups for information on this section.
Custom Module
Available to SDS and SDS/Chemical Management accounts only
The Custom Module is an indexing module located in the Product Summary. This module gives you the flexibility to index information that doesn’t fit in the other product data indexing modules.
This section allows you to select and name the fields you want to use in the Custom Module. For more information see Setting up the Custom Module.
For information on entering information into the Custom Module, see Custom Module Indexing.
