

Creating and Managing Containers
Account Administrators, Administrators, and Managers in SDS and SDS/Chemical Management accounts have the ability to create containers for the products in their eBinder. Containers allow you to track the amount of a product or ingredient you have on hand. You can then use this information for a variety of regulatory reporting purposes. For more information on reporting see Overview of Reporting.
In order to create a container for a product the following must be true:
- You have the safety data sheet for the product in your eBinder.
- You have created locations in your account (see Creating Locations for more information).
- You have assigned the safety data sheet to a location (see Assigning Products to Locations for more information).
Once you have the safety data sheet for the product assigned to a location, navigate to Product Inventory either by clicking on the product card in the eBinder and then clicking the Product Inventory button in the summary panel or by clicking on the product name in the eBinder and then clicking View Product Inventory in the Product Summary.
Creating a new container
Once in the Product Inventory screen, click on the location name where the physical container is located. In the summary panel, click Create Container.
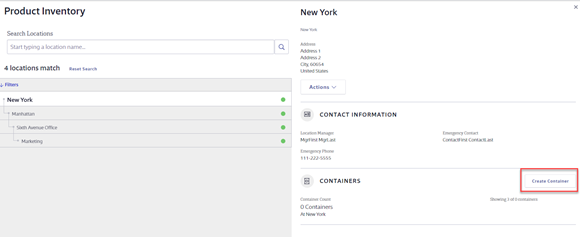
In the Create Container modal you will need to complete the following:
- Container Name – this automatically populates with the product name but you can edit it as necessary.
- Container Count – the number of containers in this batch. For example, if you have a pallet or shipment of identical containers you can enter the total number here. Note that when you enter multiple containers as a batch any changes or edits you make later will affect the entire batch.
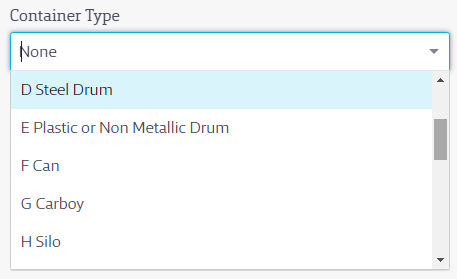
- Container Type – select the type of container from the drop-down menu. These container types correlate to those listed on the EPCRA Section 312 Tier II regulatory reporting form.
- To create a custom container type, type the name of the container type in the field and select “Create new container type [custom name]”.
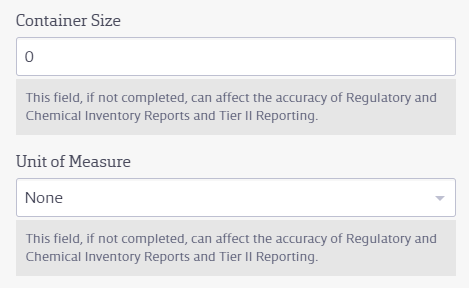
- Container Size – the numerical capacity of a single container. When adding a batch, this field should reflect only the amount in one container.
- Unit of Measure – from the drop-down menu, select the unit of measure that applies to the Container Size.
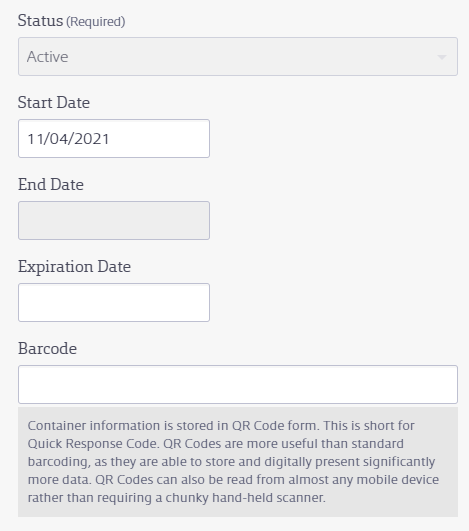
Container Status always defaults to Active. Once you’ve created and saved the container you can edit it to Inactive or Waste as necessary. See What are the different container statuses? for more information.
Start Date defaults to the date you’re creating the container, but you can change this date if necessary to reflect the date the container came on site.
End Date is grayed out until you change the container status to Inactive or Waste. At that point, it defaults to the date you changed the status to Inactive or Waste, but you can edit it if necessary.
If the product in this container has an expiration date you can enter it in the Expiration Date field. If you enter a date in this field you can use the Expired/Expiring Chemical Report to track which containers may need to be removed from or managed in your facility when they expire. Additionally, if you enter expiration dates you can setup the account to send the Expiring Inventory Notification. See Email and Notifications for more information.
Once you’ve saved the container, the system will automatically generate a container barcode number. You can then print container barcode labels which can then be scanned using the SDS/Chemical Management mobile app. If your container already has a QR Code or Code 128 barcode on it, you can enter that number here and use the SDS/Chemical Management mobile app to scan that barcode instead.
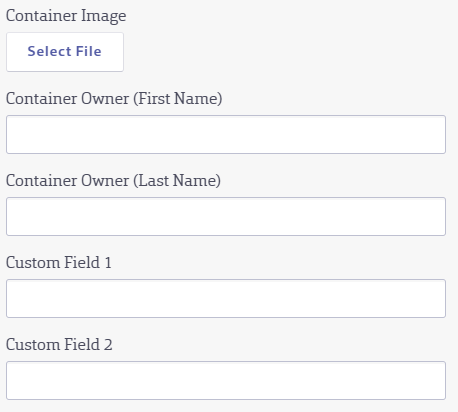
If you have a photo or image of the container you can add it using the Select File button. The image will then display on the Container Summary page and in the Location summary panel.
The Container Owner fields are optional but you may choose to use them. Information entered here appears on the Container Summary page, in the Location summary panel, and in the container history. Note that it is not included in any reports at this time.
There are two additional fields you can configure for your organization’s use. To change the names of these fields, see How do I rename the Custom Container Fields?. Information entered in these fields appears on the Container Summary page, in the Location summary panel, and in the container history. Note that it is not included in any reports at this time.
The Inventory Data section allows you to enter how much product is left in the container and allows for more detailed inventory tracking.
The first entry defaults to the amount entered in the Container Size. If you wish to track how much you’ve used of this product, click Add Entry and enter the amount remaining in the container and the date the product was used.
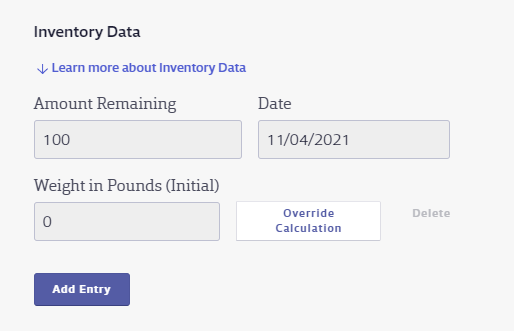
For example, if you started with 100 gallons and then used 10, you’d click Add Entry and enter 90 in the Amount Remaining field.
Weight in Pounds will automatically calculate for liquids and gasses if you have indexed specific gravity or vapor density respectively but can be overridden by clicking Override Calculation and manually entering the weight. You can then use the Product Quantity Report to see how much of a product you have remaining in your facility.
The Tier II Data section corresponds to fields on the Tier II form. If you need more information on Tier II reporting see the Tier II Checklist.

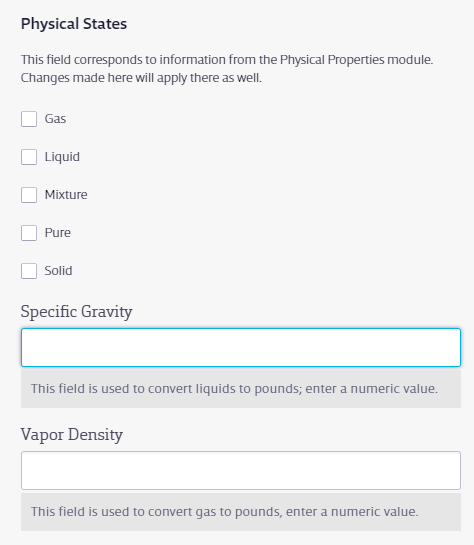
If you’ve already indexed the Physical Properties product data indexing module in the Product Summary, that information will appear in the Physical States section. If you have not already indexed that module, you can enter the relevant information here and it will also appear in the Physical Properties module.
Once you’ve completed all the necessary fields, click Save.
Viewing container information
To see high level container information for a specific product, click on the product card in the eBinder and then scroll to the Product Inventory section of the summary panel. Alternately, click on the product name in the eBinder and then scroll to the Product Inventory module. This tells you how many containers you have of that product, across how many locations, and the total quantity of Active containers. If you’ve made entries in the Inventory Data section of the container, this number will reflect the most recent entry of amount(s) remaining.

Note: Total Quantity will always be displayed in Pounds for weight, Gallons for liquid volume or Cubic Feet for gaseous volume. The system automatically converts any other unit of measure selected when creating the container to these units of measure.
To view additional information about the containers for a product, click View Product Inventory in the Product Summary. Here you have several options:
View containers at a specific location
To view the containers at a specific location, click the name of the location. Locations with containers have a container icon on the location row.
![]()
The Containers section of the summary panel shows information for up to the three most recently created containers. To see all containers of this product at this location, click View Containers.
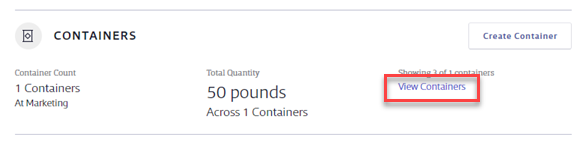
The Containers by Location page shows you the initial quantity of all Active, Inactive and Waste containers of that product at that location. To filter containers by status, click the Filters arrow and use the toggle switches to select which container statuses you want to see.
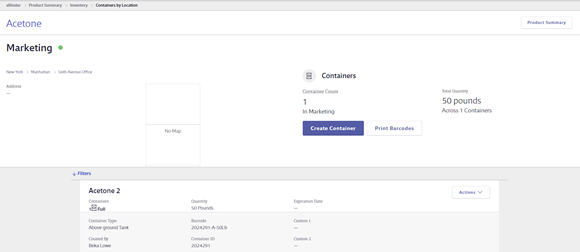
Containers are always ordered by first by container Status (Active, then Inactive, then Waste), then secondarily sorted A-Z based on Container Name.
View all containers of a specific product
To see all containers of a specific product, regardless of location, navigate to the Product Inventory page and click the View All Containers button.
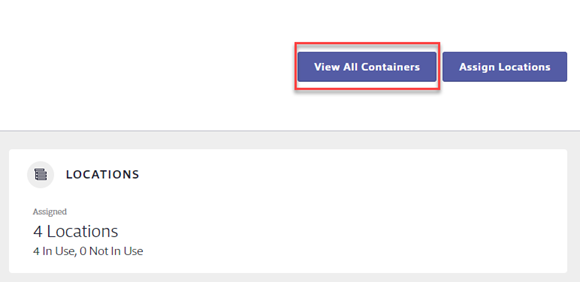
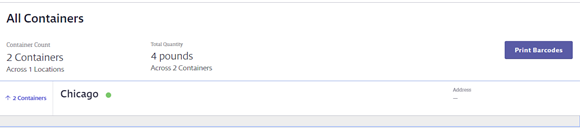
The All Containers page lists all containers of that product by location.
Editing container information
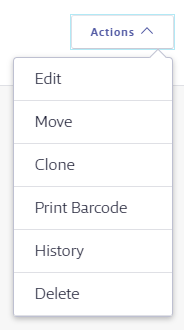
To edit container information, locate the container using the method(s) described above. Once you’ve located the container, click the Actions drop-down menu. This gives you several options:
- Edit: Gives you the ability to change some details about the container, including updating the amount remaining and changing the status from Active to Inactive or Waste.
- Mark Active: If the container’s status is Inactive, users with the correct permissions can change it back to Active. Inactive containers cannot be edited, so if any changes need to be made, you need to select Mark Active first.
- Move: If the physical container is moved from one location to another, you can move the container in the system using this option.
- Clone: Allows you to make a duplicate of the container. For example, if a new shipment of a product comes in you can clone an existing container and update the details to reflect the new dates instead of creating a brand new container from scratch. This is also useful if you have a batch of identical containers that you want to track separately. You can create one and use the Clone function to duplicate it.
- History: Allows you to see and export all of the changes that have occurred with that container
- Delete: Allows you to delete a container
Printing container barcodes
Printing container barcodes and affixing them to your containers allows you to use the SDS/Chemical Management mobile app to scan the barcode and bring up the container information on your mobile device.
Printing a barcode for a single container
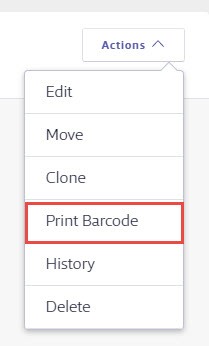
To print a single container barcode, locate the container using the method(s) described in the Viewing container information section above.
Click the Actions drop-down menu for that container and select Print Barcode.
In the Print Barcodes modal, select whether you’re printing a single barcode or a full page of the same barcode labels.
Select where you want the barcode(s) to start printing on the label sheet. Note that container barcodes are designed to print on Avery 5960 1″x2-5/8″ (or other compatible) label stock.
Click Generate to open the PDF of the label(s). Use the printing functions on your PDF reader to print the labels.
Printing barcodes for multiple containers of the same product
To print barcodes for multiple containers of the same product at the same time, navigate to the Product Inventory page and click the View All Containers button.
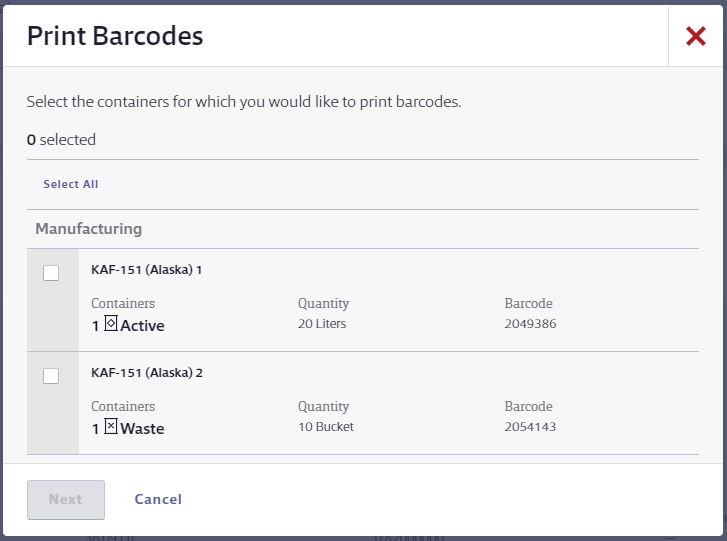
On the All Containers page, click the Print Barcodes button.

Use the checkboxes to select the containers for which you want to print barcodes or click Select All to select all containers. Click the Next button.
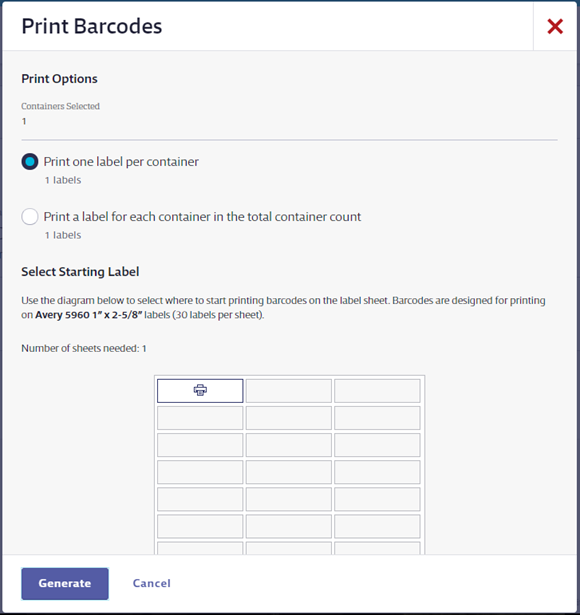
Select whether you want to print one label for each container or batch of containers (Print one label per container) or one label for each container, including an individual label for each container in a batch (Print a label for each container in the total container count).
Select where you want the barcode(s) to start printing on the label sheet. Note that container barcodes are designed to print on Avery 5960 1″x2-5/8″ (or other compatible) label stock.
Click Generate to open the PDF of the label(s). Use the printing functions on your PDF reader to print the labels.
Printing barcodes for multiple products at the same time
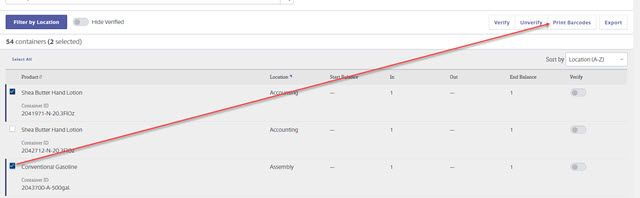
The first step of printing barcodes for multiple products at the same time is to create a Container Reconciliation that includes all the containers for which you want to print barcodes.
Once you’ve created the Container Reconciliation, select the checkboxes for the containers for which you want to print barcodes and then click the Print Barcodes button.
Select whether you want to print one label for each container or batch of containers (Print one label per container) or one label for each container, including an individual label for each container in a batch (Print a label for each container in the total container count).
Select where you want the barcode(s) to start printing on the label sheet. Note that container barcodes are designed to print on Avery 5960 1″x2-5/8″ (or other compatible) label stock.
Click Generate to open the PDF of the label(s). Use the printing functions on your PDF reader to print the labels.
