Managing Products in the eBinder
Once you’ve added safety data sheets to your eBinder there are a variety of options that allow you to manage the information associated with them.
On the right-hand side you’ll see buttons labeled Export and Maps.
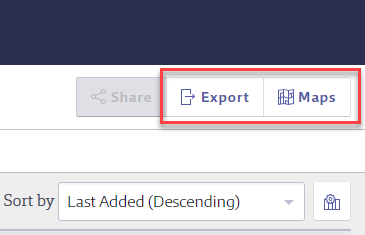
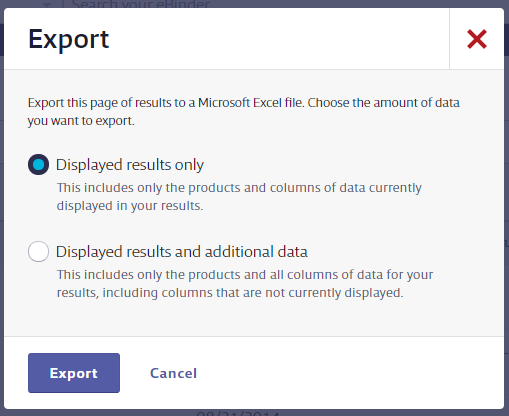
Export
Use the Export button to export all of the information in the eBinder search results into an Excel spreadsheet. This is a useful tool if you need a quick list of all the products used at your organization or if you want to export the results of a specific search for reporting purposes.
You can choose whether to export only the columns you’ve selected to display in your eBinder or to export all available columns. Then select Export to begin the process.
Note: If the export appears to be taking an unusually long time, try refreshing your browser (Ctrl + R) to check if the file has already been generated. The report is often ready quickly and refreshing can prevent delays.
Maps
Use the Maps button to quickly view maps for locations with maps assigned. Click the button to display the Maps page.
On the Maps page, use the Select Location drop-down menu to select a location’s map. Locations without assigned maps will be grayed out.
For more information about maps, see Adding and Using Maps.
Additional Options
Select the checkbox for a product or products to display additional buttons.

Labels
Use the Labels button to access the Labels page where you can generate secondary container labels for your products. See Printing Labels for more information. Selecting multiple products in your eBinder > Labels allows you to print labels for multiple products at the same time.
Locations
Use the Locations button to assign one or more products to a location or locations. See Assigning Products to Locations for more information.
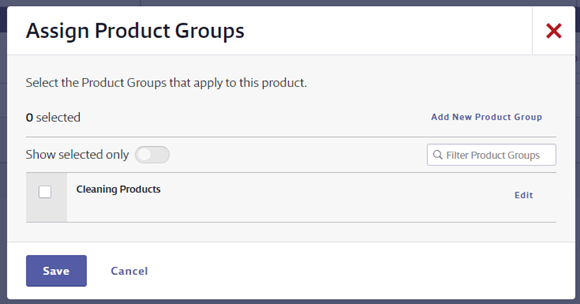
Groups
Use the Groups button to assign one or more products to the product groups you’ve created. If you haven’t yet created any groups, you can use the Add New Product Group button to create one. See Creating and Managing Product Groups for more information.
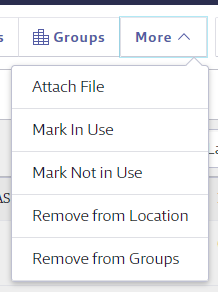
More options
Within the More drop-down, you can attach a file to one or more products. Attached files can include an image of the container, training documents, supplementary materials, or other files you want to keep with the safety data sheet. See Attach Files for more information.
The other options in this menu are dependent on first either selecting a Location or a Group.
- If you’ve selected a location where the product is currently In Use, you will be able to use the Mark Not In Use option here.
- If the product is currently Not In Use at the location you selected, you can change it to In Use by selecting Mark In Use. See Managing Products in Locations for more information on In Use and Not In Use.
- You may be able to use the Remove from Location option to remove the product entirely from the location you selected. Note that this removes all history of that product being used at that location and cannot be used if there are full containers of that product in that location.
- To remove a product or products from a Group, first filter your eBinder using the Groups drop-down in the Filters menu. The Remove from Groups option will then be activated.
Note that Mark In Use, Mark Not In Use, Remove from Location, and Remove from Groups cannot be used if you’ve activated the Search archived products toggle in the Filters menu.
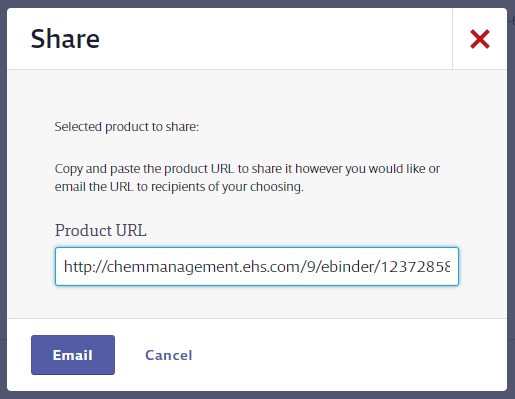
Share
Use the Share button to display the URL for the specific product in your eBinder. This URL can be used by anyone with whom you choose to share it, even if they do not have a Chemical Management account.
You can copy and paste the URL into any program you wish to use. Click the Email button to display your default email program with the URL populated in the email body.
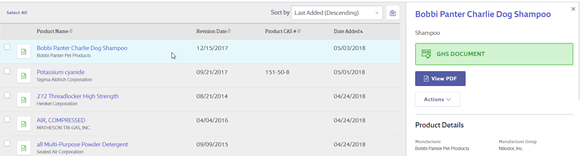
Product Card
Within the product card you can select the View PDF icon to open the PDF or select the product name to go to the Product Summary.
Select the product card to display the summary panel with additional information and options for that particular product. You can View the PDF, access many of the same functions mentioned above by selecting Actions, or go to the Product Summary using the button at the bottom of the panel.