

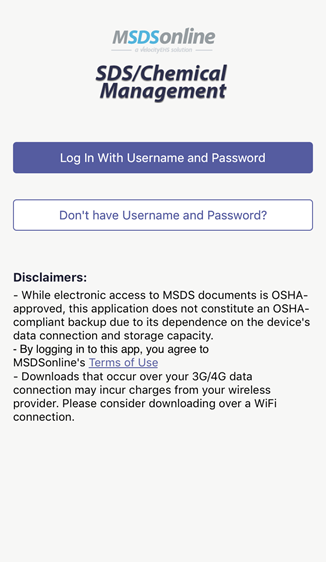
Using the SDS/Chemical Management Mobile App
The SDS/Chemical Management Mobile App is available in English for SDS and SDS/Chemical Management accounts only.
You can download the SDS/Chemical Management mobile app from the App Store and on Google Play.
With the SDS/Chemical Management mobile app for iOS and Android, your employees have the ability to quickly search and view product details and safety data sheets, and save that information to a mobile device for offline use.
Additionally, users with permission to view and/or edit containers can use the app to scan container barcodes generated by your Chemical Management system and access container information.
The SDS/Chemical Management mobile app is available for the following platforms and devices:
- iPads with iOS 9 and later
- iPhones with iOS 9 and later
- iPods with iOS 9 and later
- Android tablets with 4.4 and later
- Android smartphones with 4.4 and later
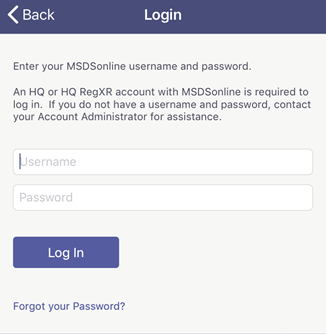
How to Log In
On the main Login screen, Account Administrators, Administrators, Managers, and General Users with usernames and passwords will tap LOG IN WITH USERNAME AND PASSWORD.
Those users will be taken to this login screen, where the username and password can be entered.
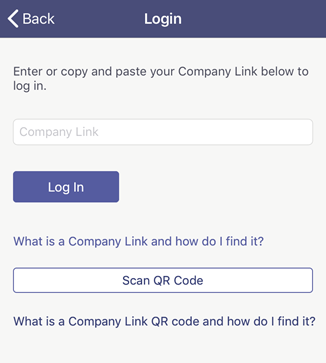
Your employees that do not have a username and password will tap DON’T HAVE USERNAME AND PASSWORD?
Those users see this login screen, where they can enter your Company Link or they can scan the Company Link QR code. See Sharing your company link with staff for more information on generating QR codes and sharing your Company Link.
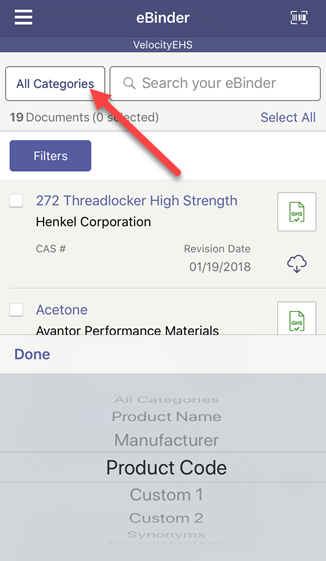
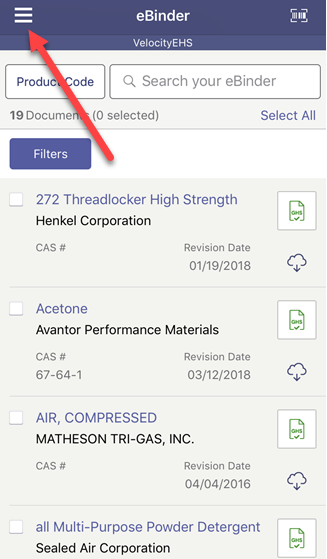
How to Search the eBinder
Enter a search term in the search bar and then tap Search from your device’s keyboard.
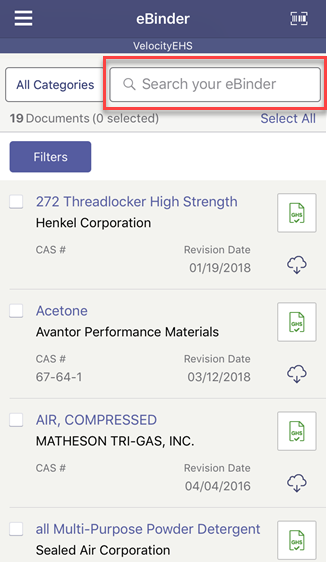
By default, your search term will be applied to all categories. You can also select a single search category from the All Categories dropdown menu. For example, if you know the Manufacturer is Sigma, you can select Manufacturer from the dropdown menu and then enter “Sigma” as your search term.
When the device is online, you will be able to search for any of the products in your eBinder, whether or not they have been saved to your device.
When the device is offline, you will be able to search only for products that have been saved to your device for offline access.
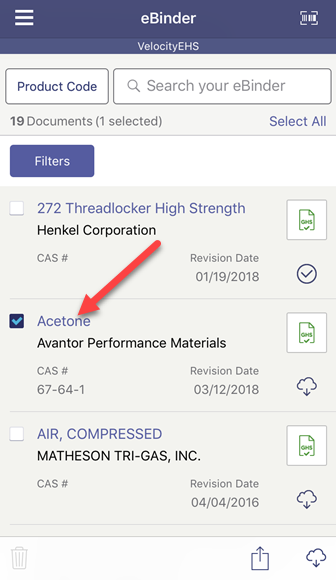
Tap the Select All button to select all of the products on the screen.
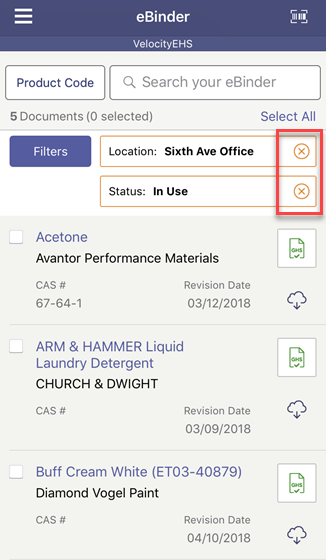
Tap the Filters button and apply the filters to narrow your results. You can apply multiple filters.
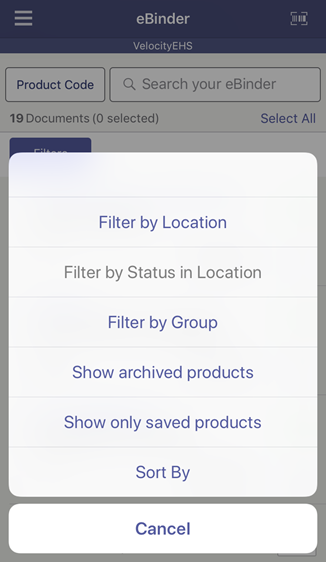
- Use Filter by Location to search products assigned to a selected location.
- Filter by Status in Location becomes available after a location is selected. Use this filter to search for products that are In Use or Not In Use in a selected location.
- Use Filter by Group to search products assigned to a selected group.
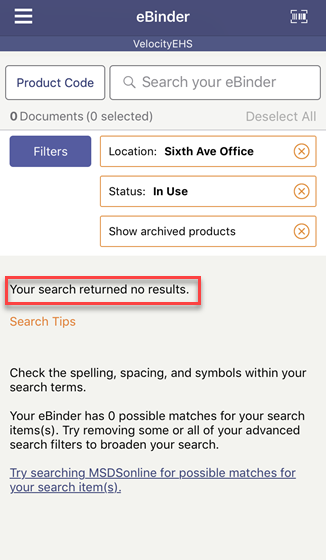
- Use Show Archived Products to search products that are Archived.
- Use Show Only Saved to view the products that have been saved to the device for offline use.
- Use Sort By to change the order of the products in your eBinder
When the device is offline, the Show Only Saved filter is automatically applied.
To remove a filter, tap the X on the right side of the filter label.
If your search returns no results, you will have the option to search the SDS database.
Working with Your Search Results
Tap the Document button to view the product’s safety data sheet (PDF).
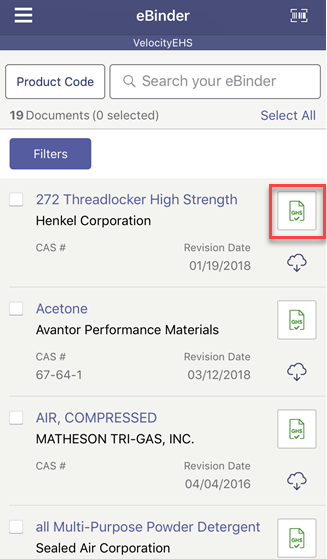
Tap the Save to Your Device button to save the document to the device.
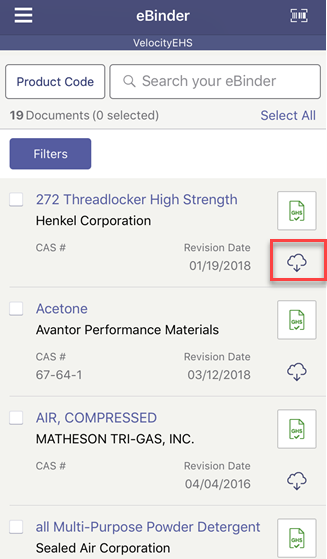
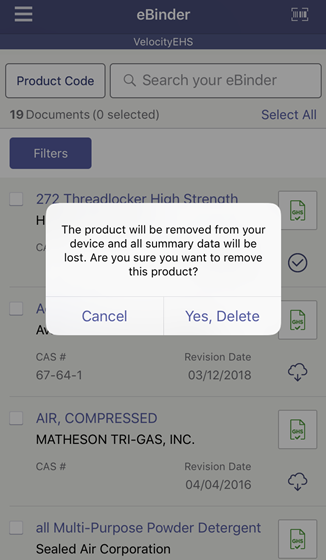
Tap the Remove from Your Device button to remove a saved document.
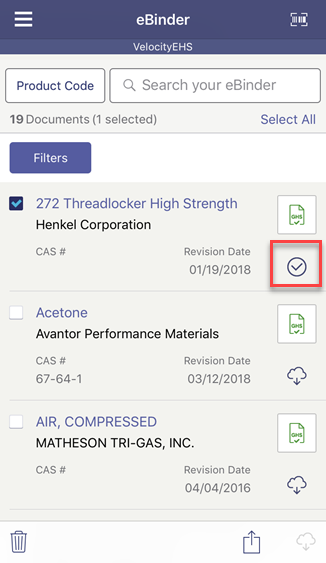
Tap the checkbox next to a Product Name to save or remove multiple documents. Select the Save to Device or Remove from Device buttons from the toolbar at the bottom of the screen.
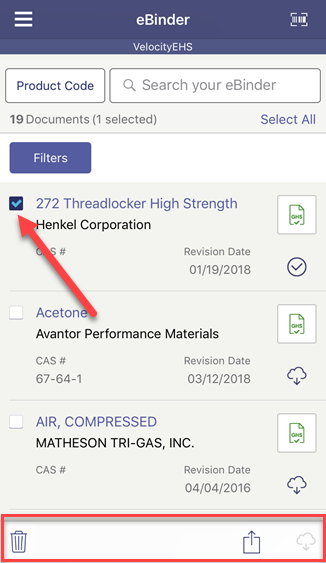
Tap the Product Name to view its Product Summary. Note if you don’t have access to the Product Summary, this will be disabled.
How to View the Product Summary
Tapping the Product Name on the eBinder screen will open the Product Summary screen. Note if you don’t have access to the Product Summary, this will be disabled.
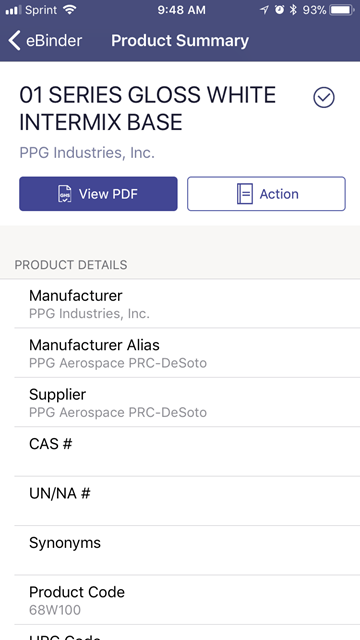
You can save and remove documents from the Product Summary screen. In the example above, the Remove from Your Device button is available, indicating the document is already saved to the device. Tap it to remove the document from your device. If this document was not already saved to your device you would see the Save to Your Device button which you could tap to save the document.
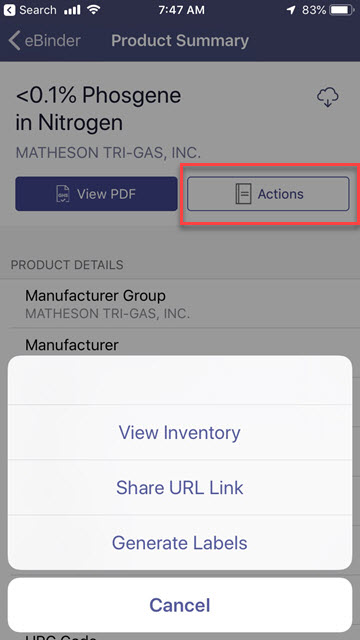
Tap the View PDF button to view the safety data sheet.
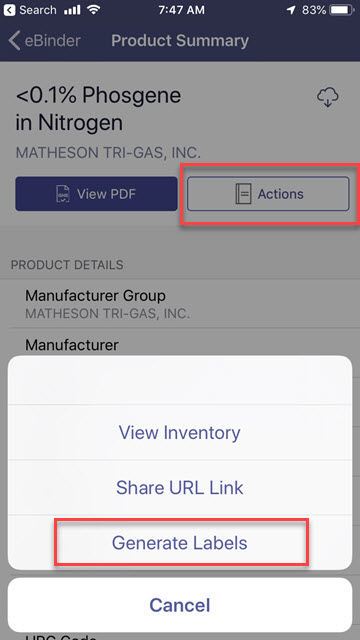
Tap the Actions button and select View Inventory to view the location(s) to which the document is assigned, tap Share URL Link to share it or tap Generate Labels to generate secondary container labels for the product.
When the device is offline, you will be able to view the Product Summary only for the documents saved to your device.
How to Use the Inventory Screen
When you tap on the View Inventory option in the Actions menu from the Product Summary screen, the Inventory screen will be displayed.
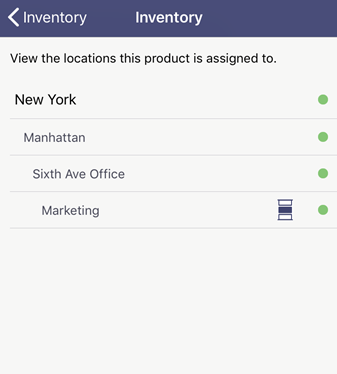
On the Inventory screen you will be able to view the locations in your company where the product is assigned. Green dots next to location names illustrate that the product is In Use in that location.
Red dots next to location names illustrate that the product is Not In Use in that location.
Container icons indicate that there is at least one container of this product at that location. Tapping on the location row will open the Containers screen. Tap on the container cell to access additional information on the Container Details screen.
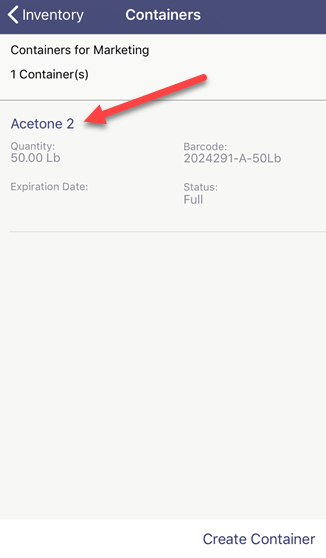
You can also create a new container of this product at this location using the Create Container button.
Account Administrators and Administrators will be able to view all locations within the company.
Managers will be able to view the locations to which they are assigned.
General Users will be able to view the locations to which they are assigned if you have them using a username and password to login. General Users will be able to see the Container icons if they have the Access to Containers permission enabled. See Editing General User Role Permissions for more information.
How to Add a Container
The easiest way to add a new container is from the Containers option in the navigation menu.

The Create New button is displayed at the bottom right of the Containers screen. Tap the Create New button to display the Create Container form.
Enter your container’s information into the form fields.
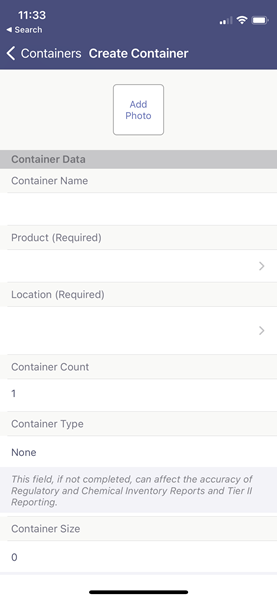
Once you’ve entered all the required fields, tap the Save button that will appear in the top right to create the container.
Note that you need to have the SDS for the product for which you’re creating a container in your eBinder before you can create a container for that product.
How to Access and Manage Container Information
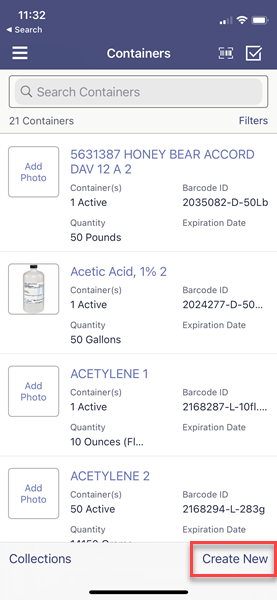
The easiest way to access and manage container information is from the Containers option in the navigation menu.
When you click on Containers, you will see a list of all containers across all locations to which you have access.
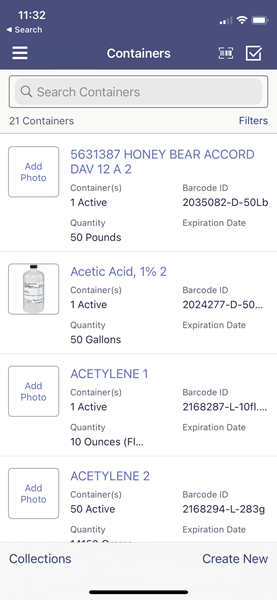
You can use the Search Containers bar to search for containers by:
- Container name
- Product Name
- Barcode
- Container ID
Tap on Filters to filter or sort the list of containers.
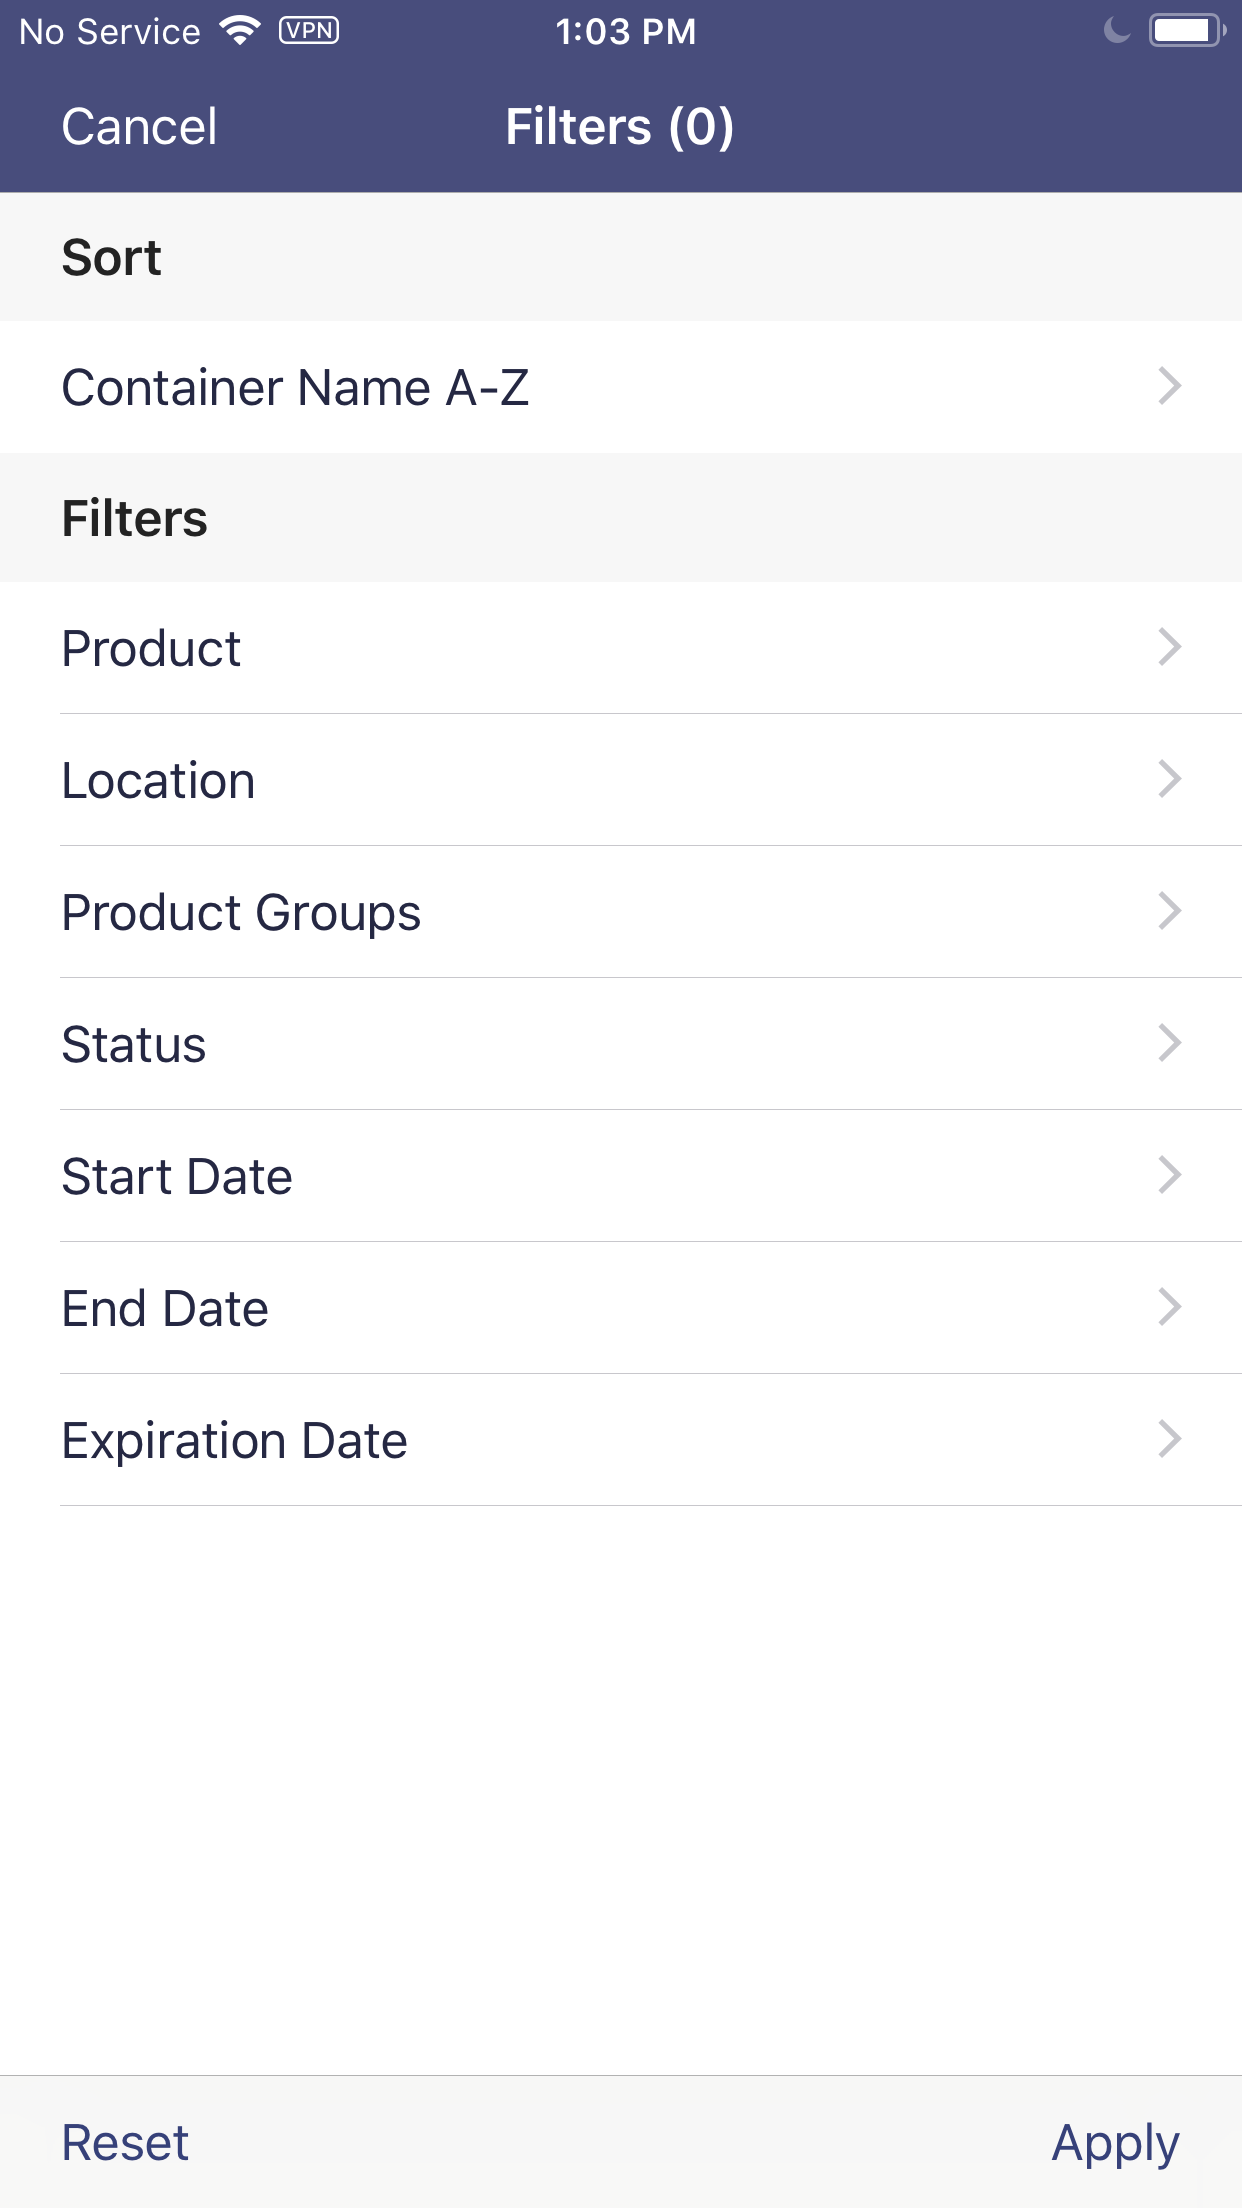
Make your selections and tap Apply.
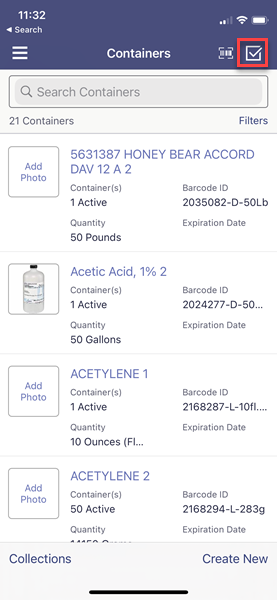
To make changes to multiple containers at the same time, tap the Enable Selection button.
Tap the checkboxes for the products you wish to change and then tap the Actions button.
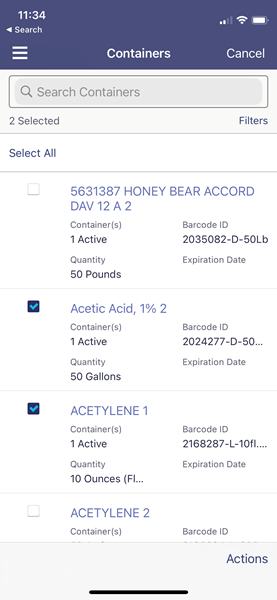
In Actions you can Delete, Move, Change Status or Add to Collection.
Container Collections are a way to group containers together. You can create a new Collection by tapping the Collections button in the bottom left-hand corner of the Containers screen or by tapping Create New from Add to Collection in the Actions menu.
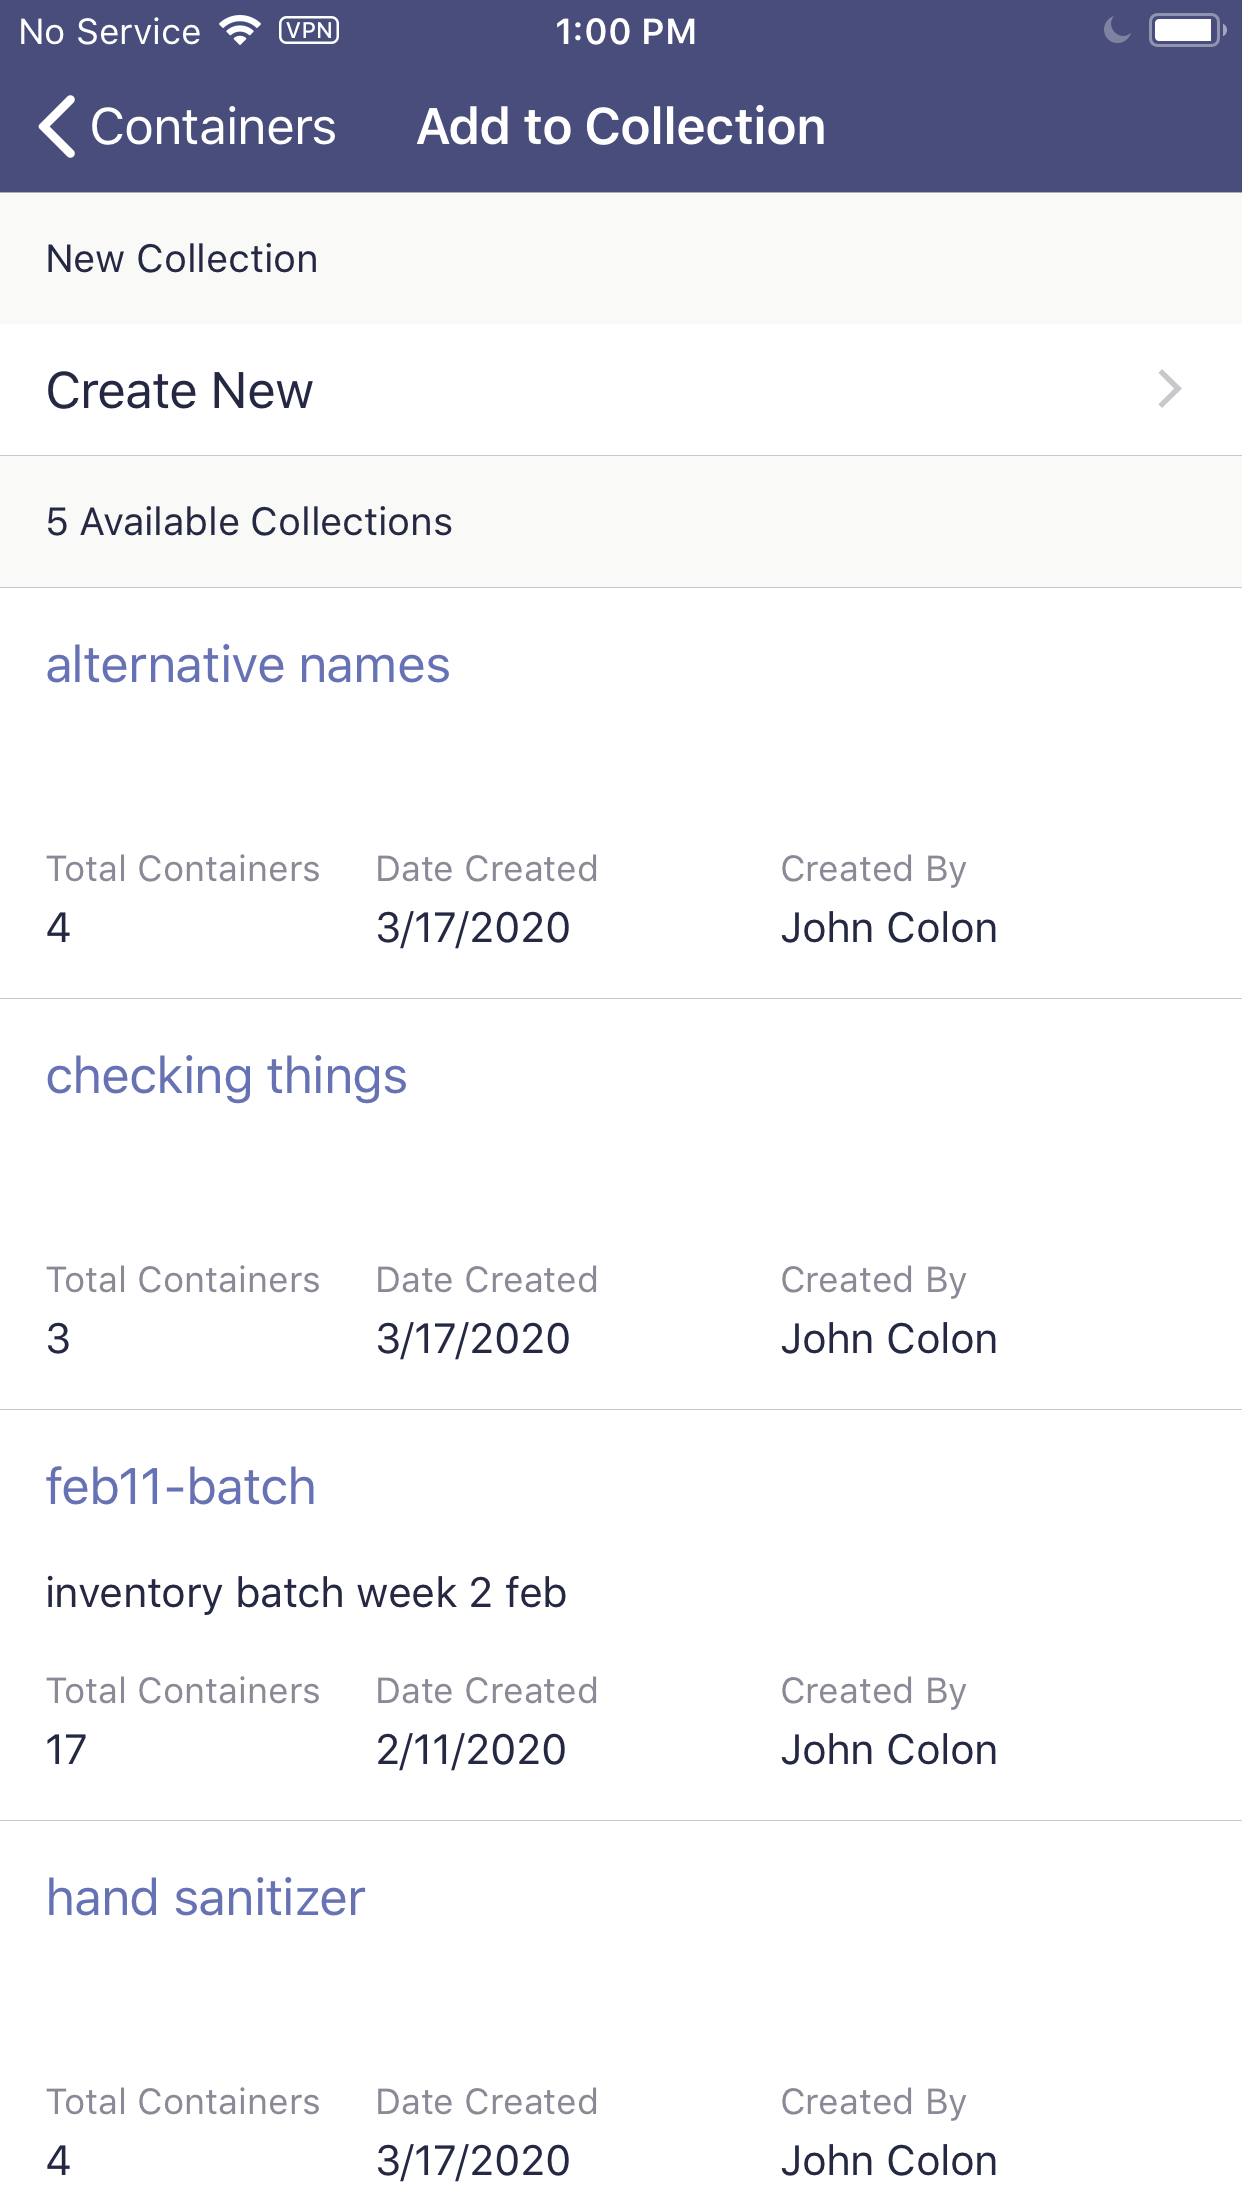
Container Collections are only available in the SDS/Chemical Management mobile app. To view containers in a Collection, tap on the Collection name.
To remove a container from a collection or make edits to the container, swipe left on the container row and tap either More or Remove. You can also remove or make changes to multiple containers at the same time using the Enable Selection button in the top right.
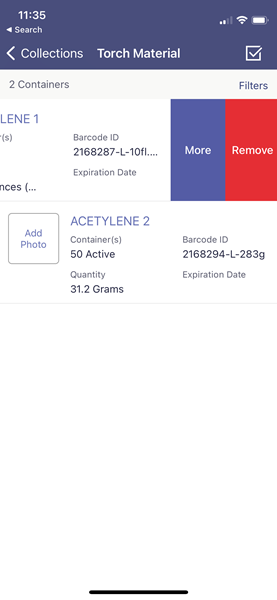
To make edits to a single container, tap on the container from the main Containers screen. You can make changes to the editable fields by tapping on the field and making your selections.
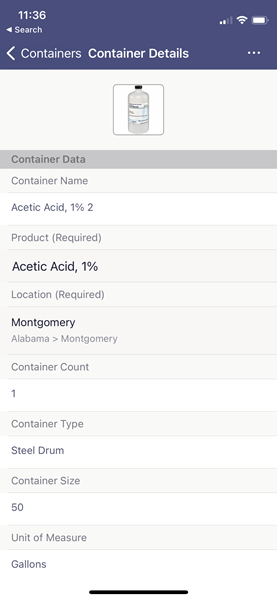
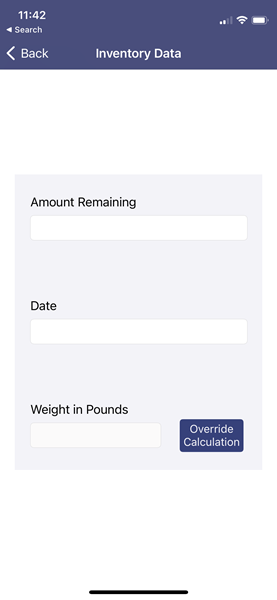
To adjust the amount remaining in a container, tap Add Entry in the Inventory Data section.
Enter the Amount Remaining and the Date. Weight in Pounds will calculate automatically if you’ve already indexed specific gravity or vapor density, as appropriate. Tap Add to complete.
For additional options, tap on the Container Details Options menu.

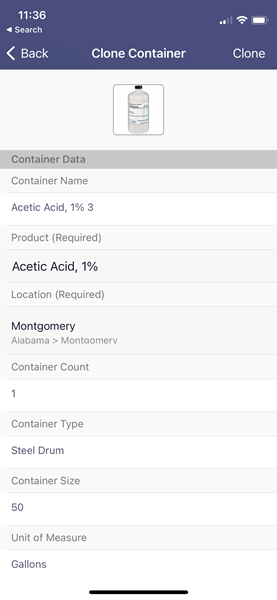
Cloning Containers
Select Clone from the container options to clone the container. Make any necessary edits to editable fields by tapping on them and then and tap Clone.
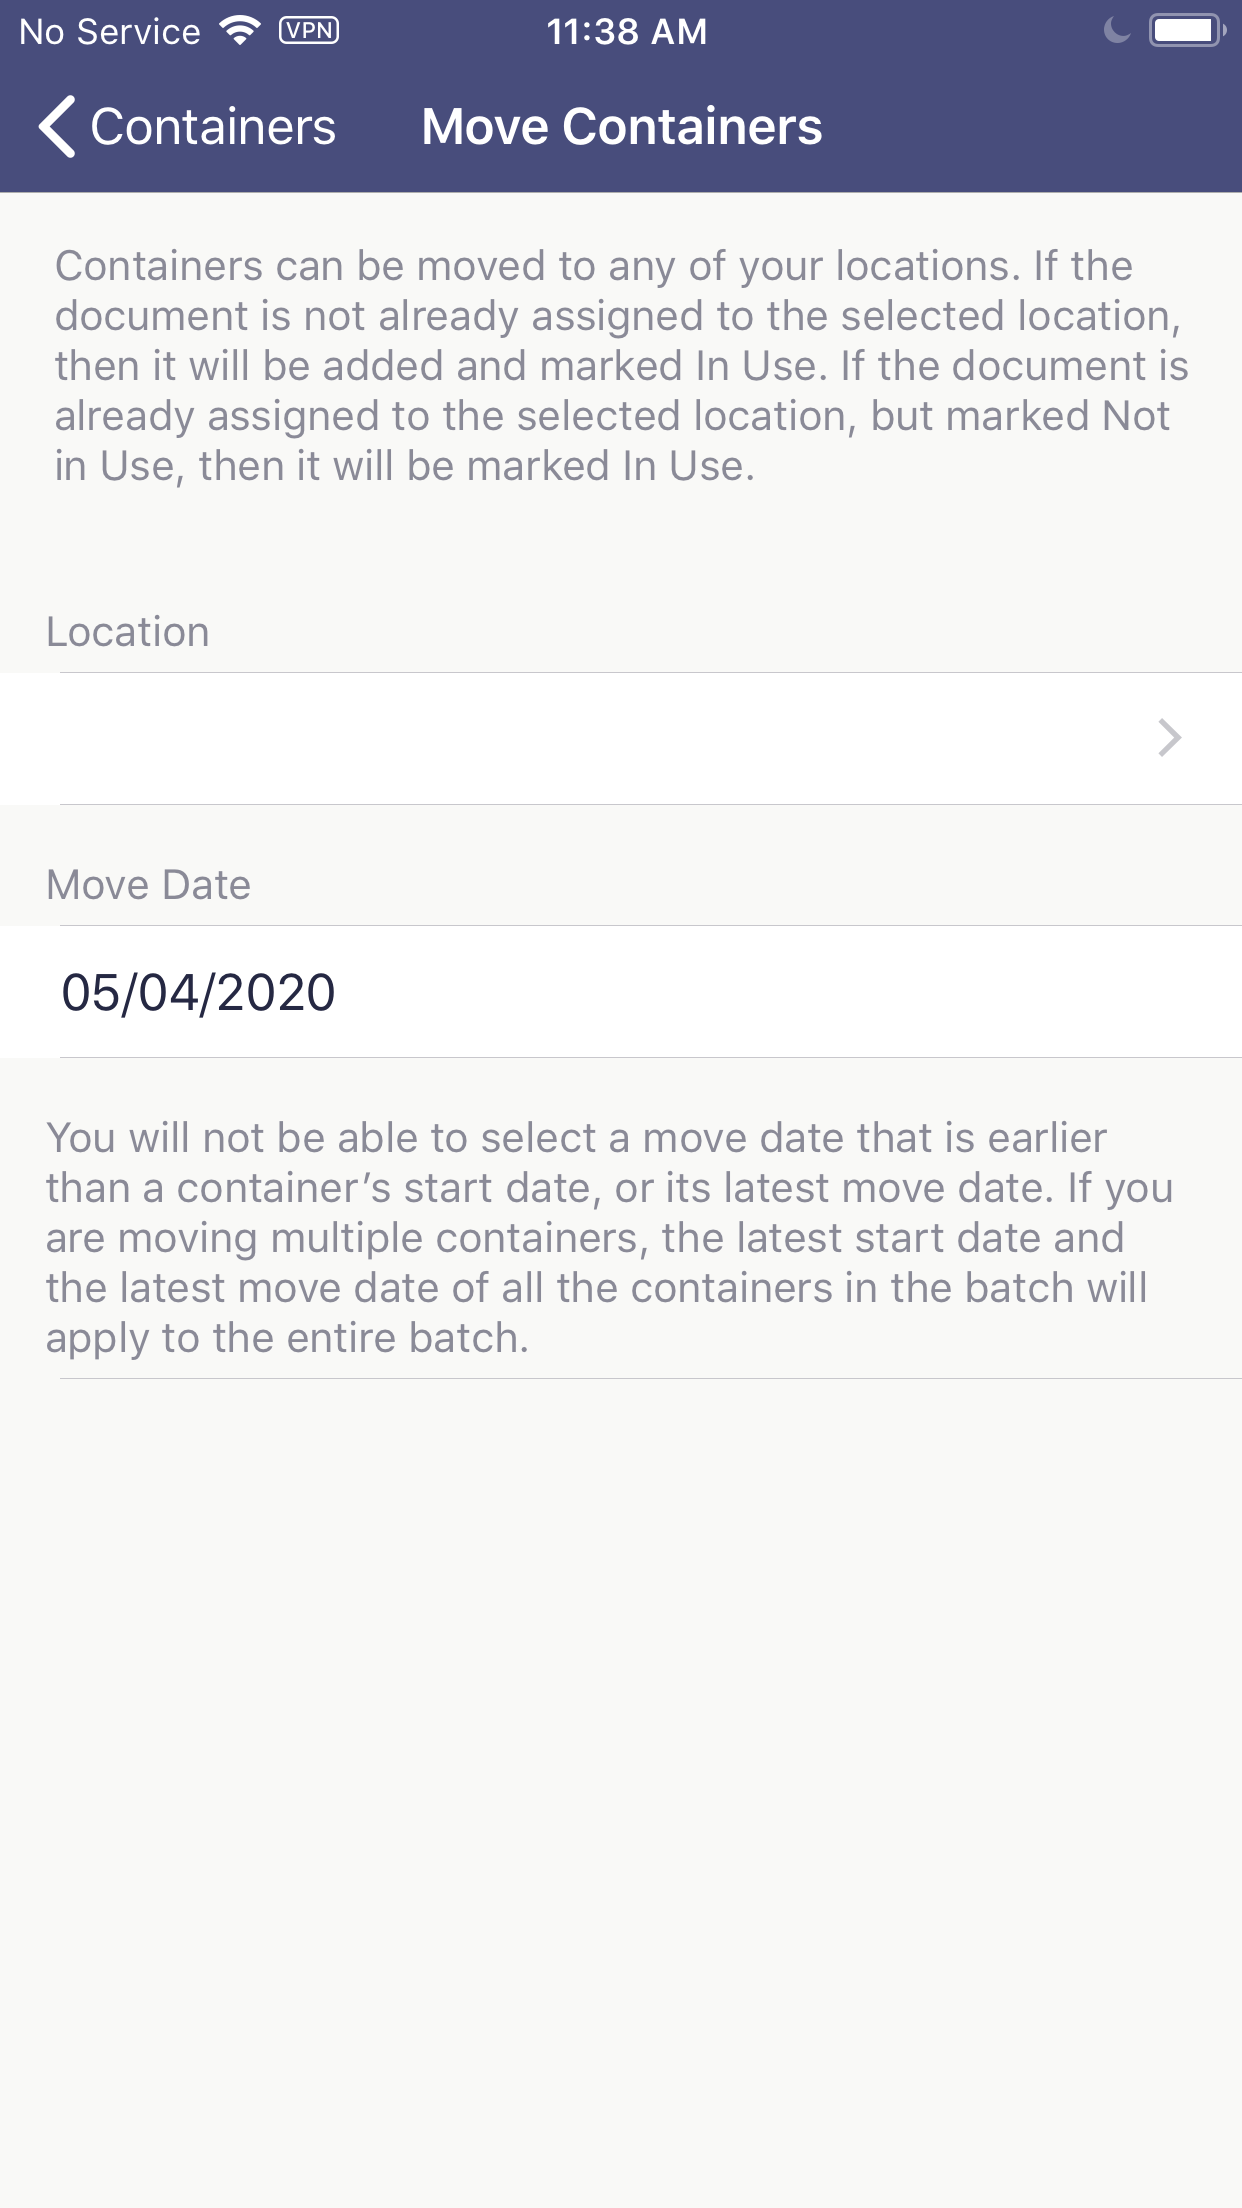
Move Containers
Select Move from the container actions to choose a location and move date for the container.
Deleting Containers
Tap the Actions or Options button and then select Delete to delete the container or containers
Accounts Admins, Admins, Managers and General Users with the correct permissions can also access container information from the inventory module or they can use the Scan button in the eBinder screen.
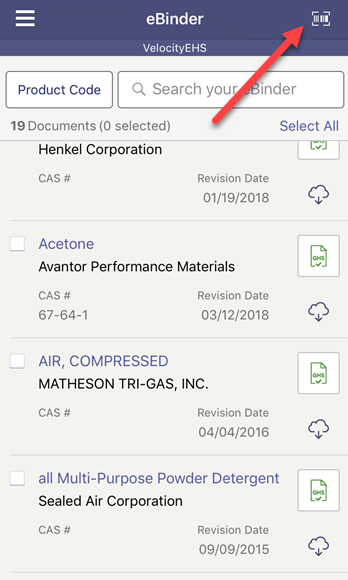
Tapping the Scan button will access your device’s camera and allow you to scan container barcodes you’ve generated from your Chemical Management system and Code 128 barcodes that have been indexed in your account. In addition, if you’ve indexed UPCs for your products, scanning the UPC will bring up product information.
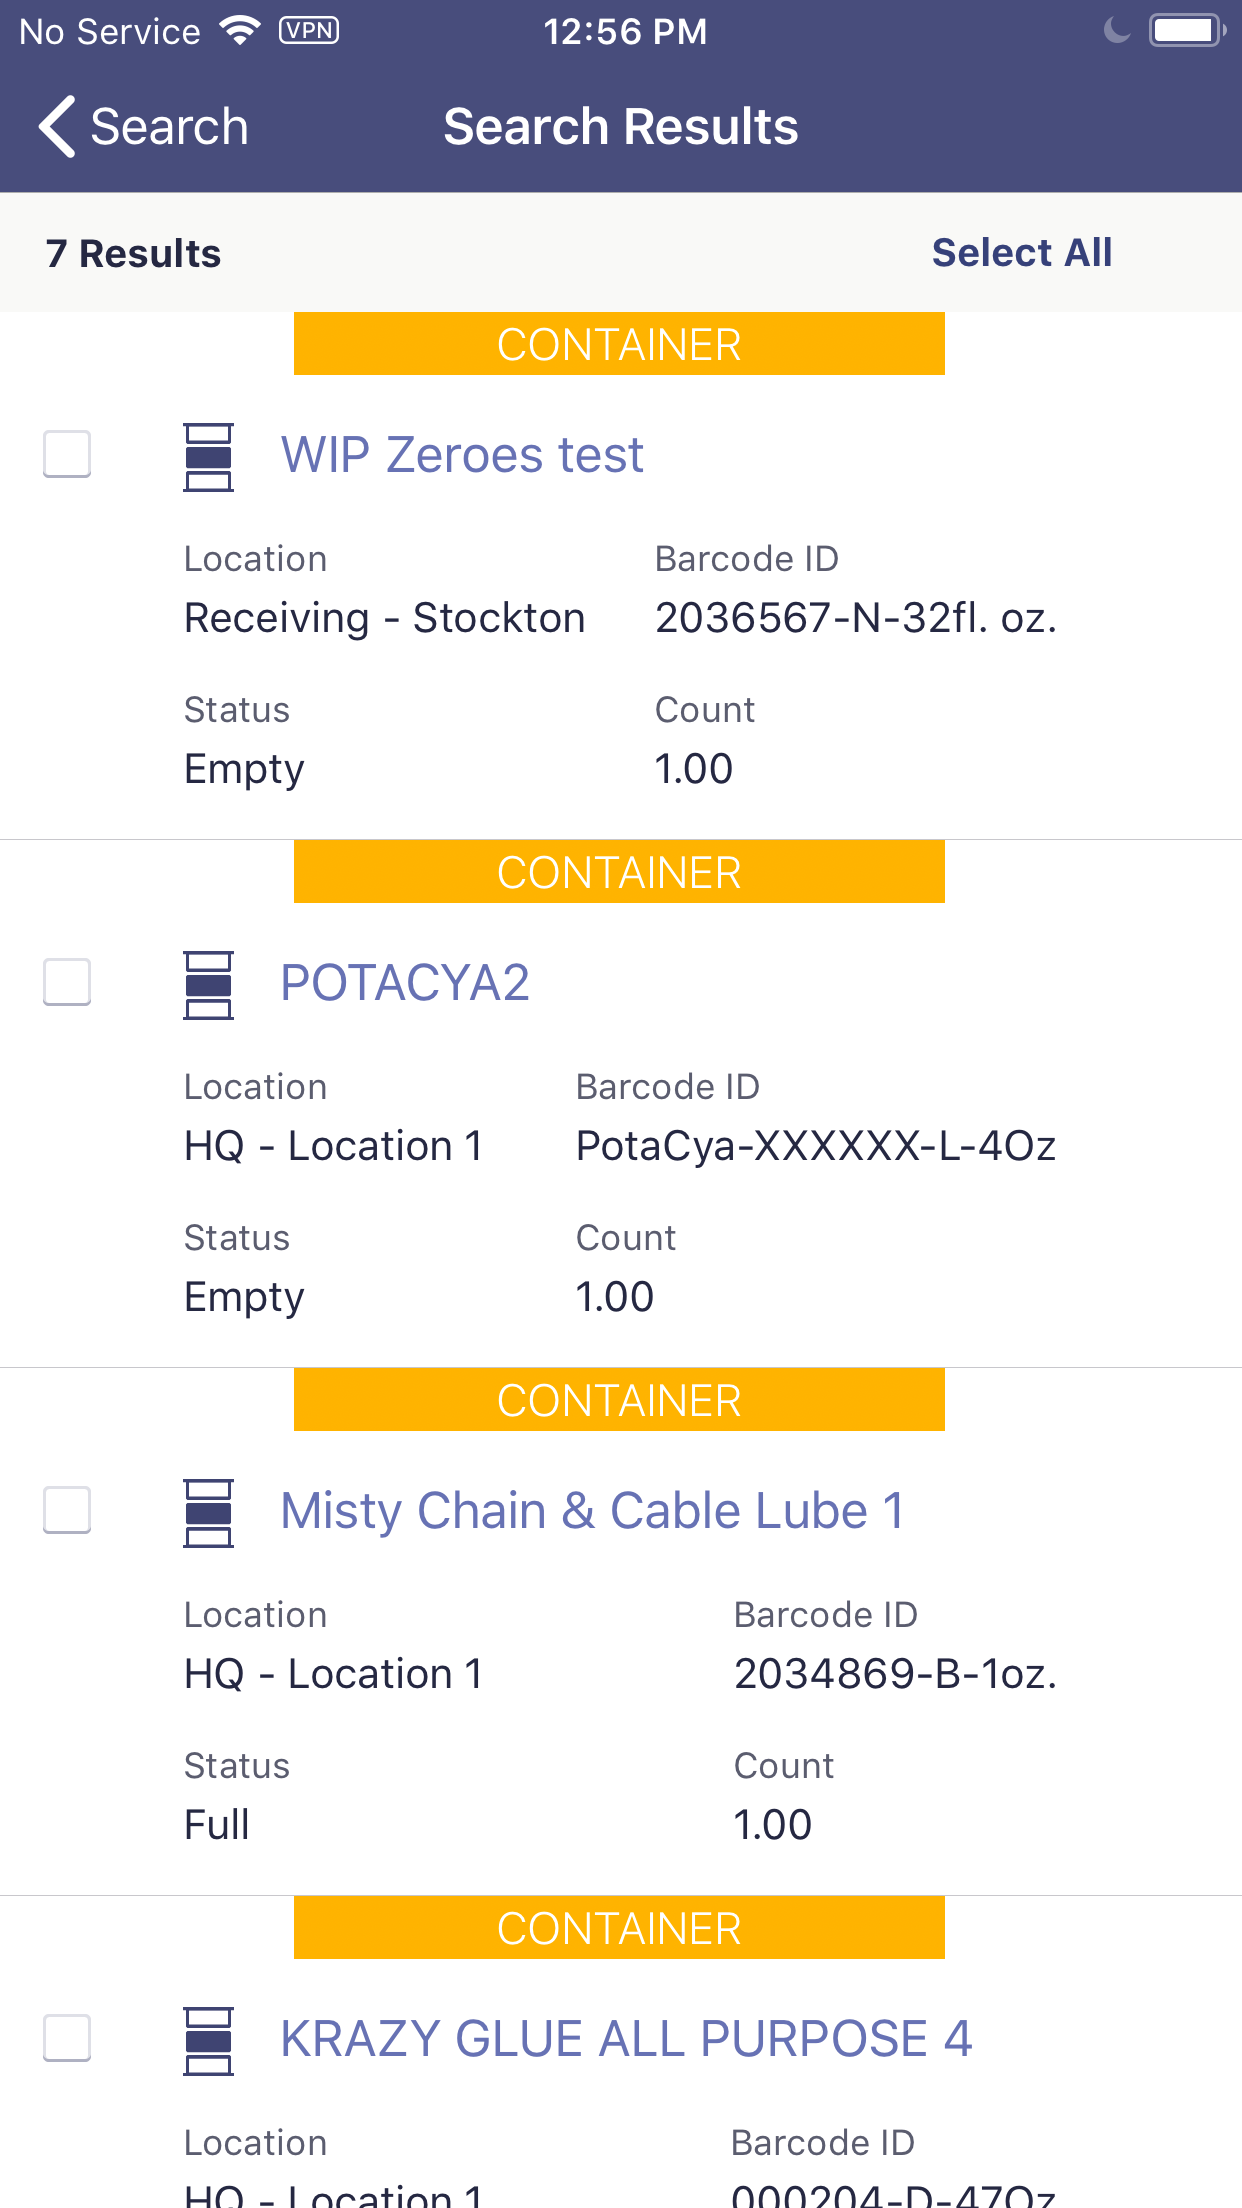
Tap on a result from the Search Results screen to display the Container Details screen.

To access previously scanned containers tap on the Scan button in the eBinder screen and then tap on the Scan History button. The Scan History screen displays information from the last 30 days.
![]()
To manually search for a container barcode, tap on the Manual Barcode Search button from the Scan screen. You can type the barcode ID or a UPC code that is already indexed for a document.
![]()
How to Print Labels
Navigate to the Product Summary by tapping on the product name in the eBinder screen. Once in the Product Summary, tap on the Actions button and then on Generate Labels.
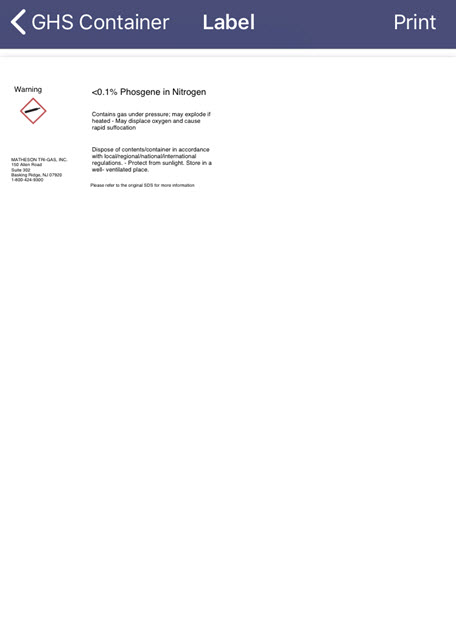
On the Generate Labels screen you will see any Custom Labels created in your account as well as the GHS Container label template. This following information applies to the GHS Container label template.
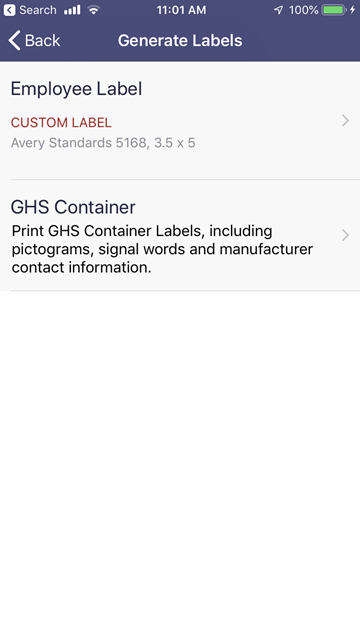
Tap on GHS Container to review or edit the label selections. If the information is correct, tap Generate.
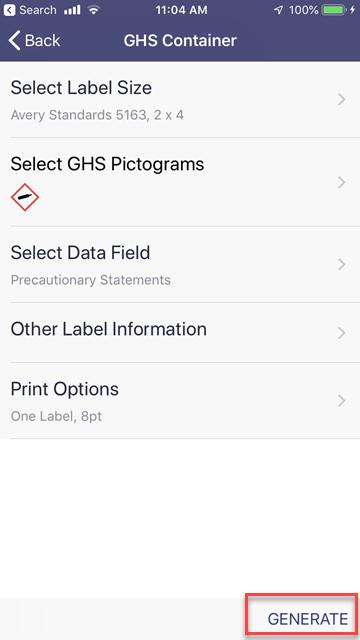
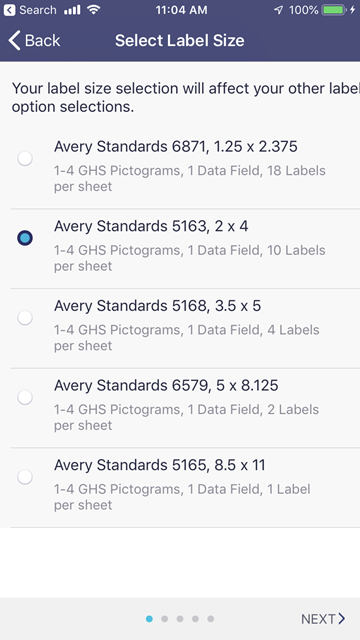
To select a different supported label size, tap Select Label Size. On the Select Label Size screen, tap the label size you wish you use.
Tap Back to return to the GHS Container information screen or tap Next to adjust the selected GHS Pictograms.
To select or adjust the GHS Pictograms, tap Select GHS Pictograms from the GHS Container screen or tap Next if you’re on the Select Label Size screen.
On the Select GHS Pictograms screen the system will automatically select up to the first four unique indexed pictograms, but you can untap one of those check boxes then tap one for a different indexed pictogram to add it to the label.
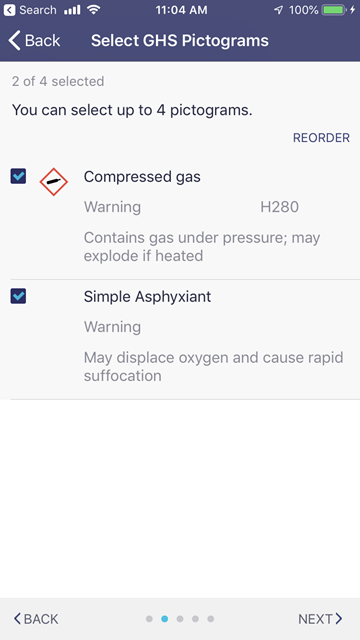
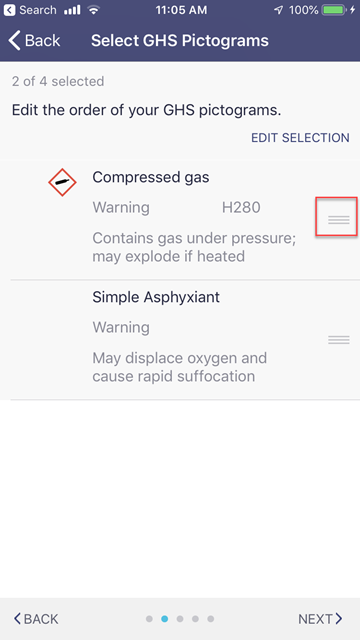
To rearrange the order of the pictograms, tap Reorder. Then long tap on the reorder icon and drag the the pictogram into the desired order.
Tap Back at the top of the screen to return to the GHS Container information screen or tap Next to adjust the selected data fields.
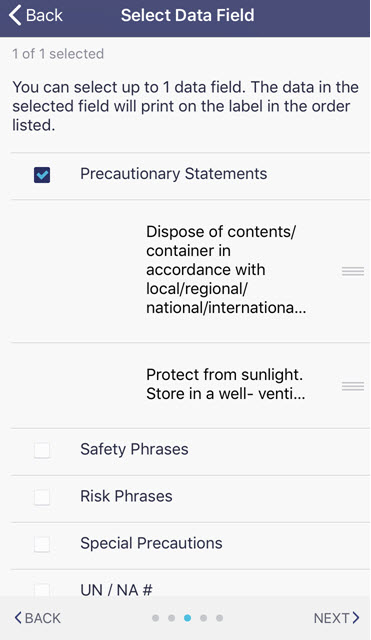
To select or adjust the selected data fields, tap Select Data Field from the GHS Container screen or tap Next if you’re on the Select GHS Pictograms screen.
Precautionary Statements will be automatically selected as your data field option. You can rearrange the Precautionary Statements by long tapping on the reorder icon and dragging to change the order. If you want to include a data field other than Precautionary Statements, untap Precautionary Statements and select a different data field.
Tap Back at the top of the screen to return to the GHS Container information screen or tap Next to add information to the Other Label Information field.
To add information the Quantity field, tap Other Label Information from the GHS Container screen or tap Next if you’re on the Select Data Fields screen.
The Quantity option is designed to support the European Union’s Classification, Labeling and Packaging (CLP) Directive, but you can use this field even if it’s not a requirement for you.
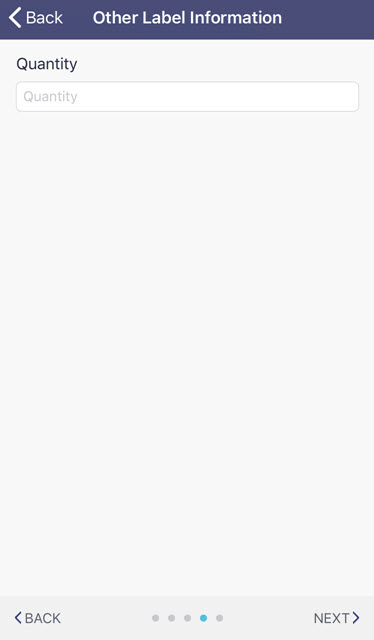
Tap in the Quantify field and use your device’s keyboard to enter the appropriate information.
Tap Back at the top of the screen to return to the GHS Container information screen or tap Next to select Print Options.
To select print options, tap Print Options from the GHS Container screen or tap Next if you’re on the Other Label Information screen.
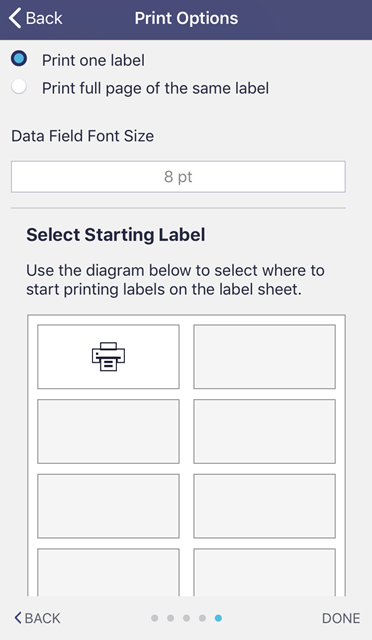
In Print Options, select whether you want to print a single label or an entire page of the same label. You can also select a font size. This is useful if your label includes a lot of text. Making the font smaller may allow more of the text to appear on the label.
Lastly, use Select Starting Label to change where on the label sheet your label will print. If you are only printing a single label and you don’t want to waste a whole sheet of blank labels, this is where you can select where to put the image on the sheet for printing.
Click Done to return to the GHS Container screen. Click Generate to generate the label as a PDF. Use your device’s print functions to print the label to a connected printer.
How to Use the Settings Screen
To access the Settings screen, click on the Navigation menu in the upper left-hand corner.
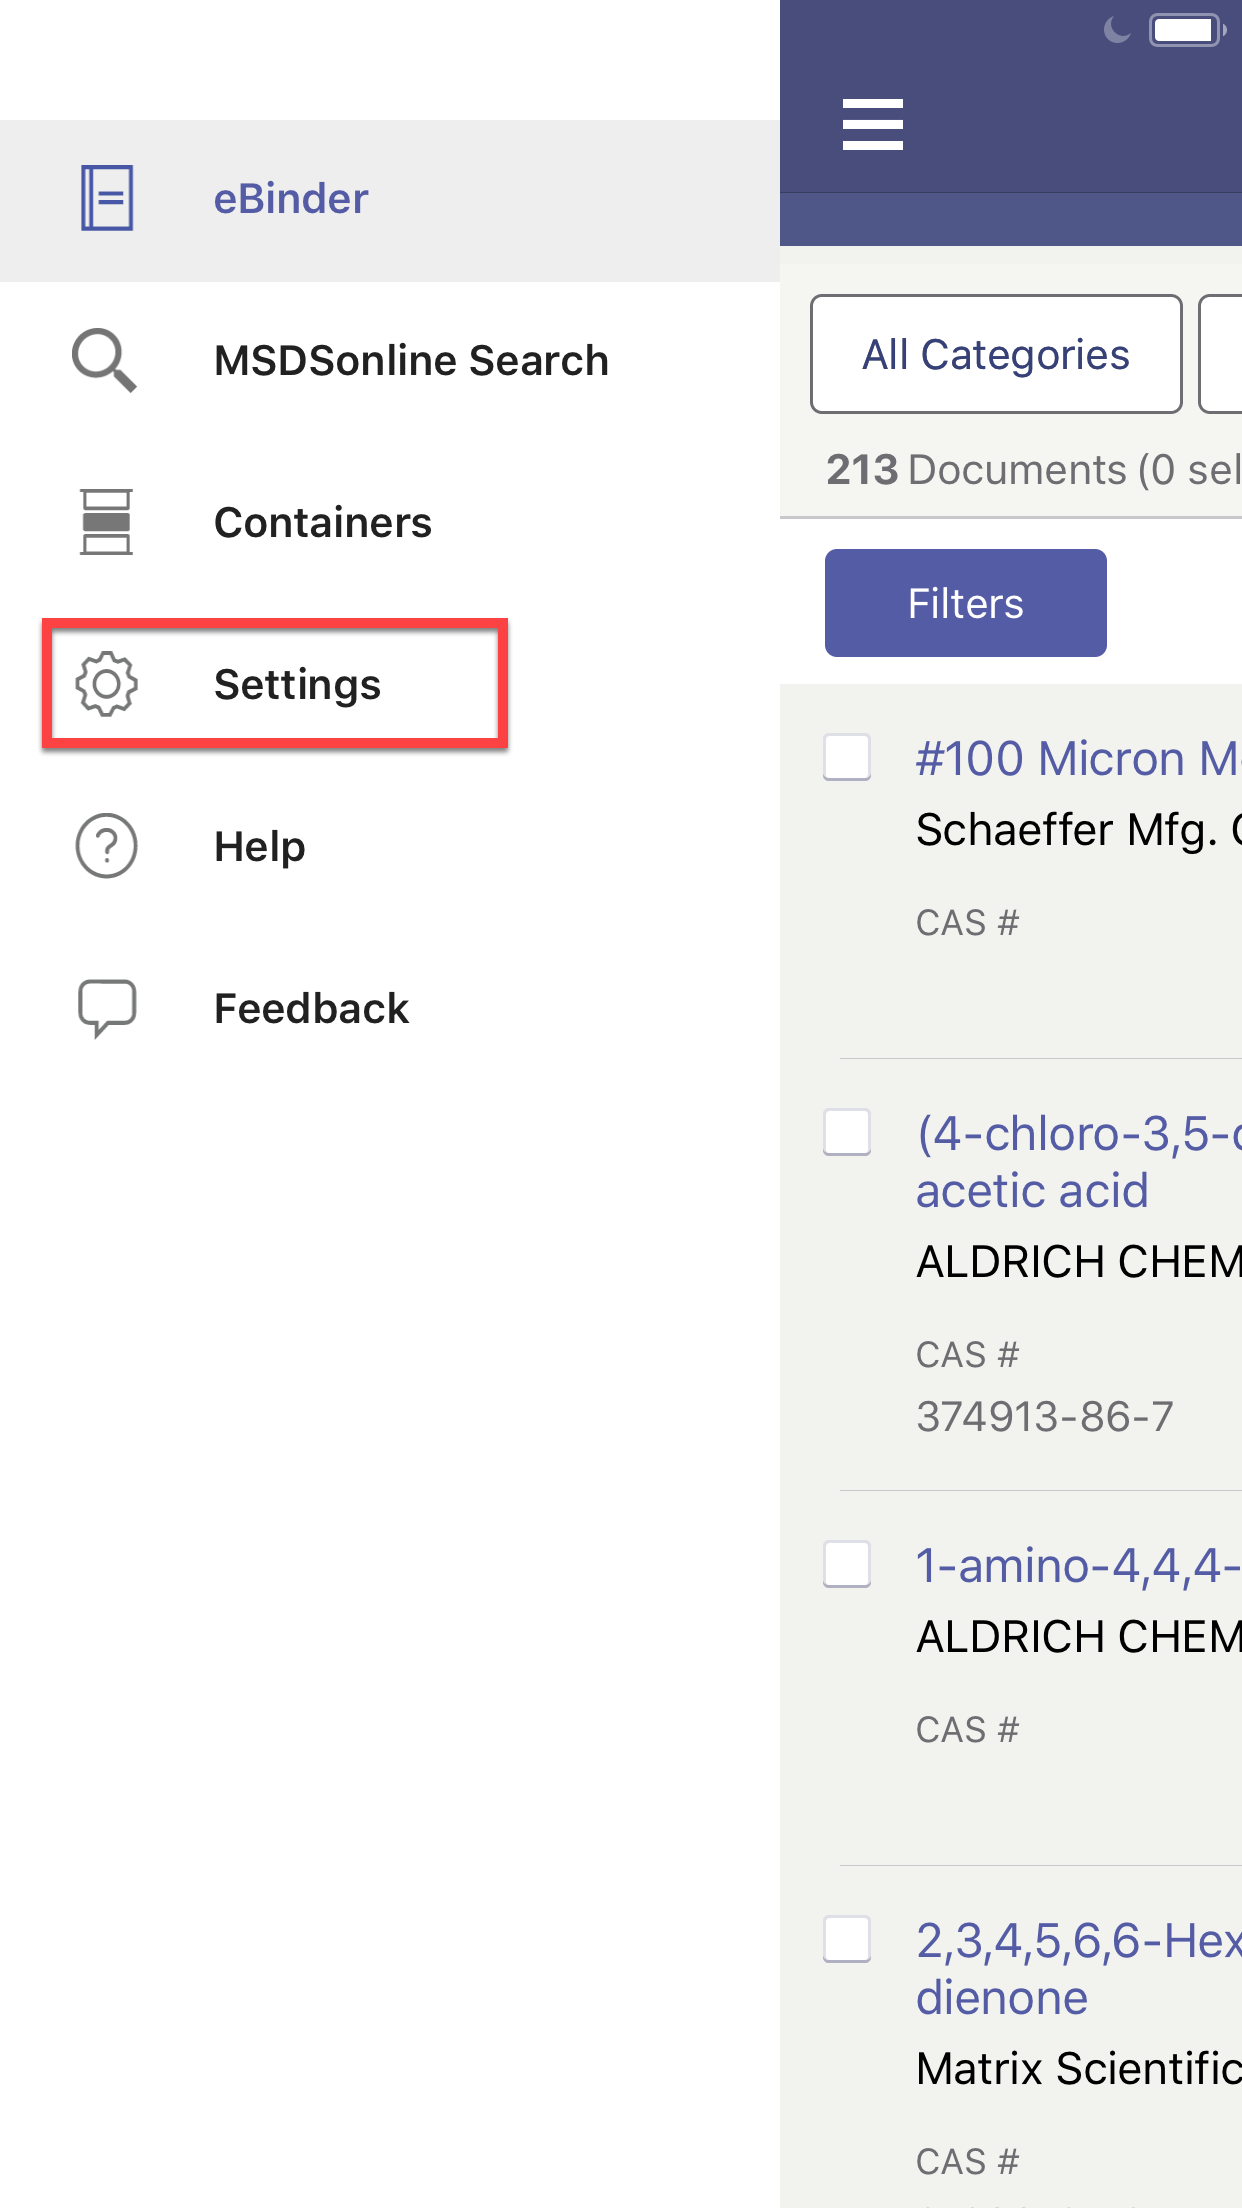
You can view how much space your eBinder is utilizing on your device. The display of storage space used is for the user that is currently logged-in.
To remove all saved products and completely clear your offline eBinder, tap the Delete My Saved Content button. You can delete all of the content that is currently saved to the device from this screen. The Delete My Saved Content button only deletes the content of the logged-in user.
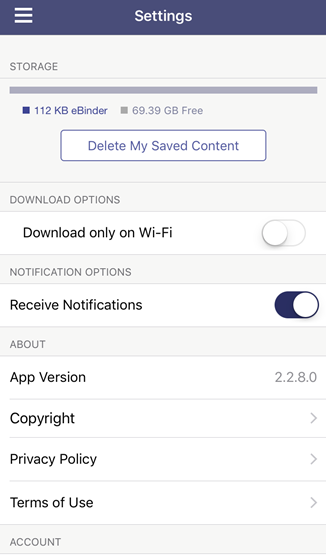
To set downloads to occur only when your device is connected via Wi-Fi, use the Download only on Wi-Fi slider. This option is available so you can avoid using your monthly data allowance when downloading documents to your device for offline use. This may be your preferred option if you have a limited data plan.
The About section of the Settings screen contains the app’s version, and the Privacy Policy.
From the Settings screen’s About section, you can also view the Terms of Use. Tap “www.msdsonline.com” to open the full website (this will launch the device’s web browser).
The Account section of the Settings screen contains account information for the logged in user.
Account Administrators, Administrators, Managers, and Signed-in General Users will see their name and the Company Name.
Anonymous General Users will see their Company Link and Company Name.
Tap the Log Out button to log out of the eBinder app.
How to use MSDSonline Search
From the Navigation menu in the upper left-hand corner of the screen, select SDS Search.
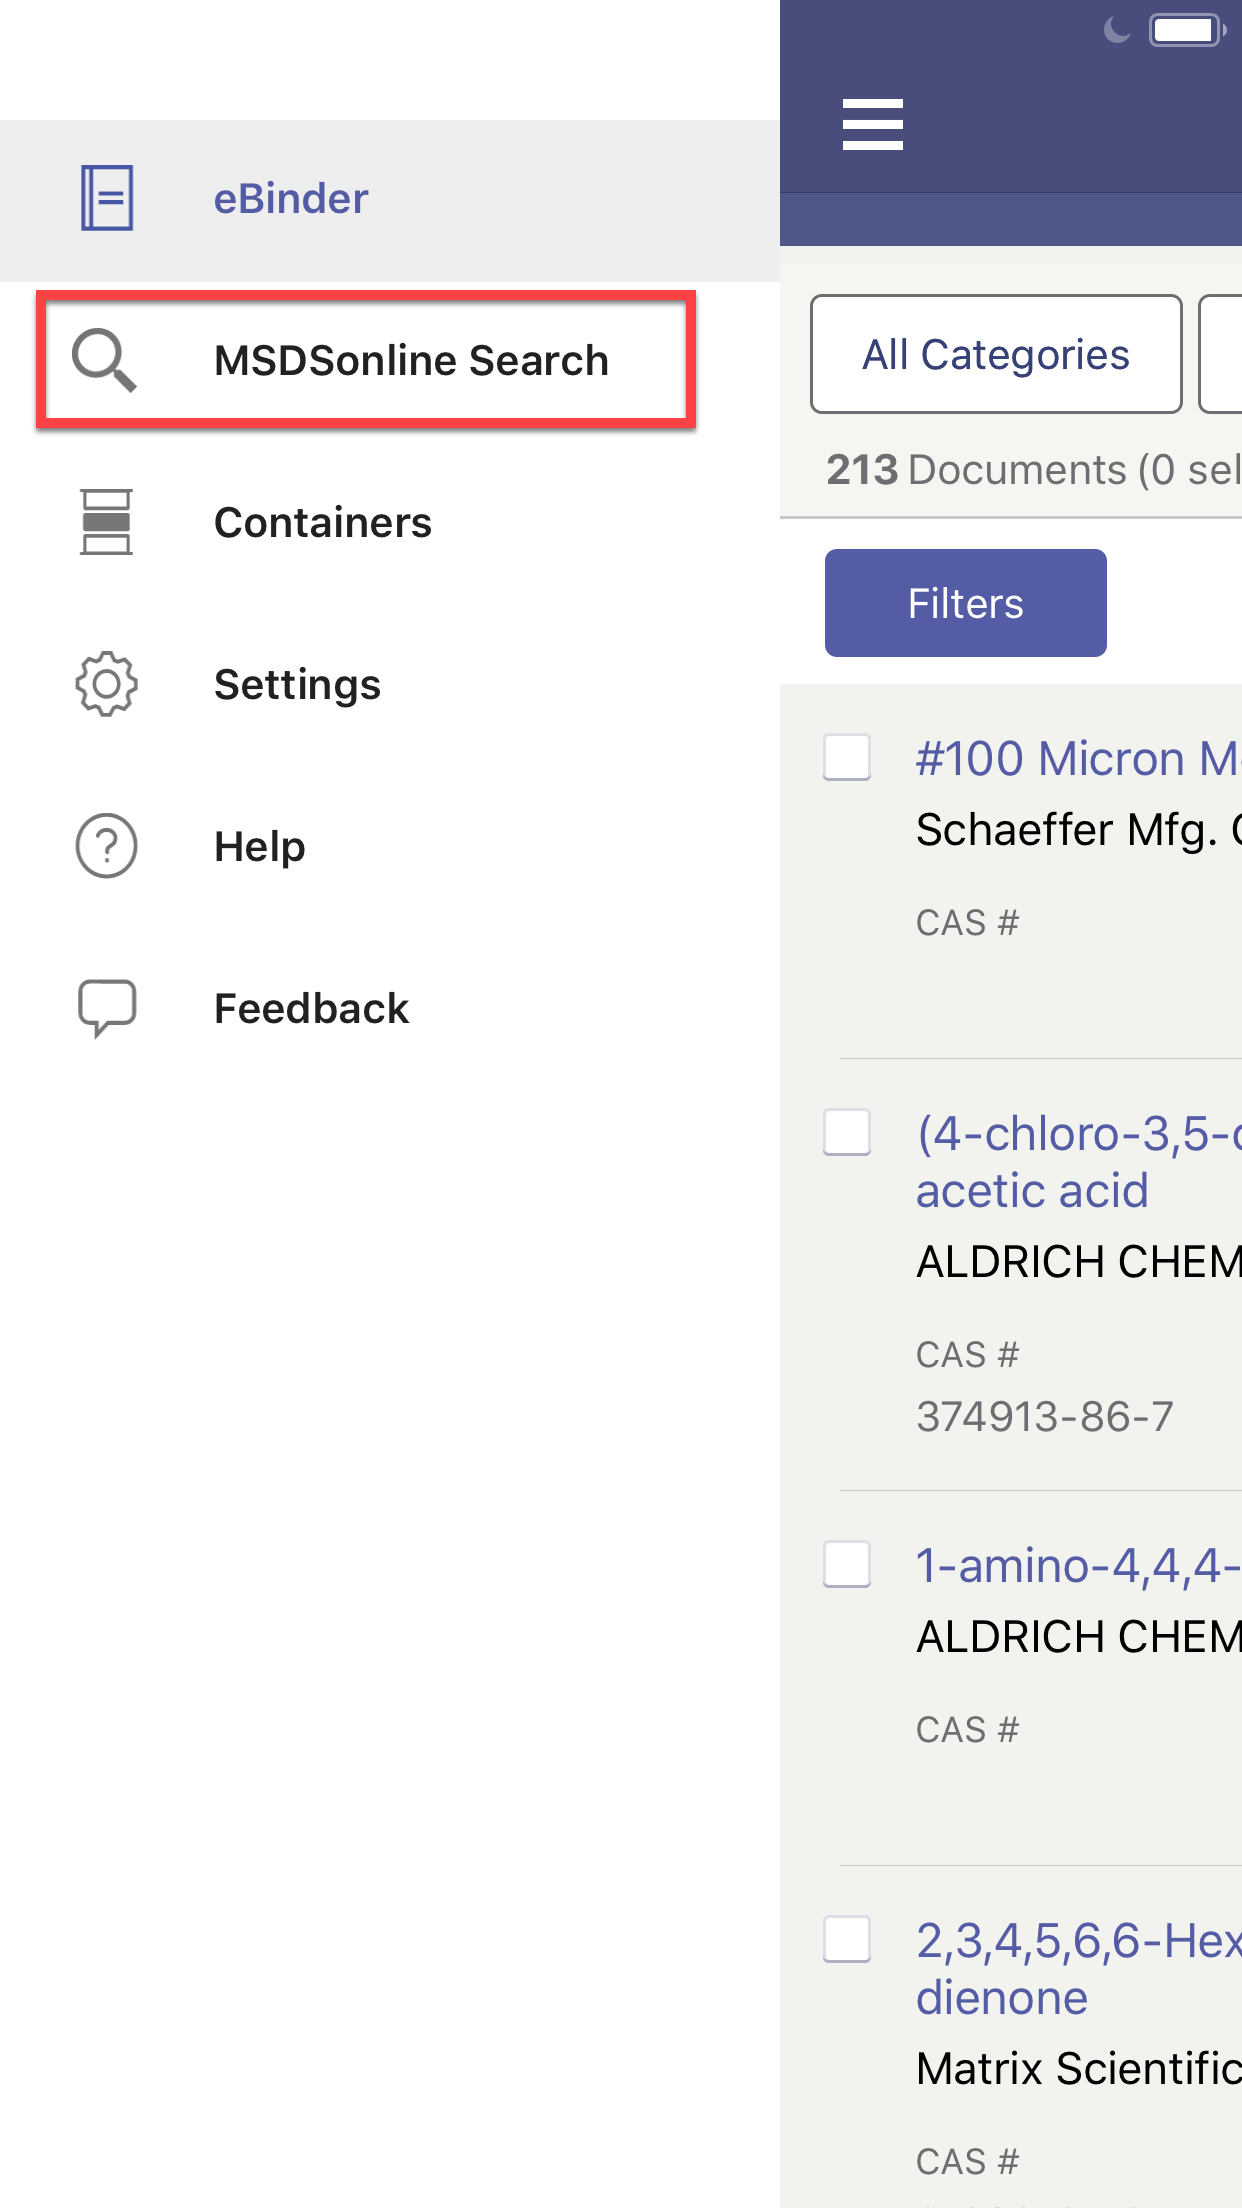
Enter your search term and tap Search in your device’s keyboard.

You can then use the Filters button to filter your results by Revision Date, Regulatory Format, and choose how the results are sorted with the Sort By option.
Tapping on the PDF icon will open the PDF. Tapping on the product name will open the SDS details screen.
To add a safety data sheet to your eBinder from SDS Search, tap the checkbox next to the product name and then tap Add to eBinder.
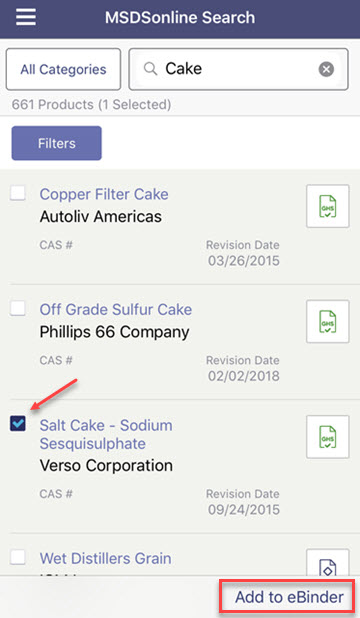
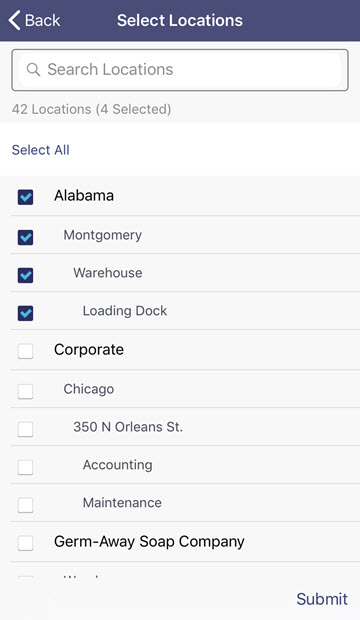
If you have locations setup in your account and you have permission to assign SDSs to locations, select the appropriate location(s) and tap Submit.
If your account is setup with an approval process, any questions the user must answer as part of this process will appear in the mobile app.
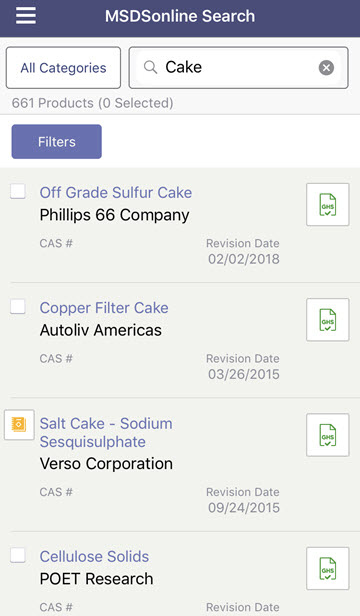
Once the SDSs is added, the checkbox changes to the “In eBinder” icon. Tapping this icon takes you to the Product Summary for that product.
If your account is setup to route safety data sheets added from SDS Search to the Queue, the appropriate licensed user needs to log into the website using an Internet browser on a computer or mobile device to access the Queue and approve or add the SDS.
