

Assigning Products to Product Groups
Before you can assign products to a group, you must first create at least one Product Group. See Creating and Managing Product Groups for more information.
Once you’ve created at least one Product Group you can start assigning products to groups. There are several ways you can do this.
Assign Products to Groups in the eBinder
Assign Products to Groups in the Summary Panel
Assign Products to Groups in the Product Summary
Assign Products to Groups in the eBinder
This method is recommended if you need to assign multiple products at the same time. Once you locate the product or products you want to assign in your eBinder, use the checkbox next to the product(s) to select it. The Groups button will then display above the eBinder search results grid.
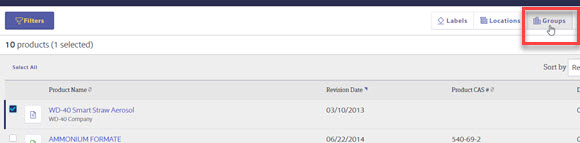
Click on the Groups button to launch the Assign Product Groups window. Select the checkbox for the group(s) to which you want to assign the product and click Save.
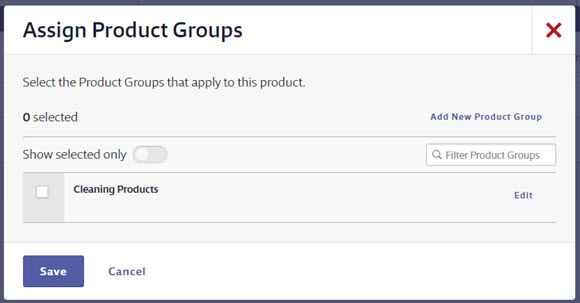
Note that you can also edit the product group information or add a new product group here. This is helpful if you realize that, while you have added some product groups, you still need to add the specific group for this particular product(s). You can add it here without going back to the Product Summary settings.
Assign Products to Groups in the Summary Panel
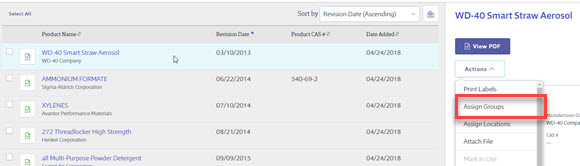
To assign one specific product to a group, click on the product card to launch the summary panel. Click on the Actions menu and then choose Assign Groups.
In the Assign Product Groups window, select the checkbox for the group(s) to which you want to assign the product and click Save.
Note that you can also edit the product group information or add a new product group here. This is helpful if you realize that, while you have added some product groups, you still need to add the specific group for this particular product(s). You can add it here without going back to the Product Summary settings.
Assign Products to Groups in the Product Summary
To assign one specific product to a group from the Product Summary, access the Product Summary for that product either by selecting the product name in the eBinder or by selecting the product card and then accessing the Product Summary from the Summary Panel.
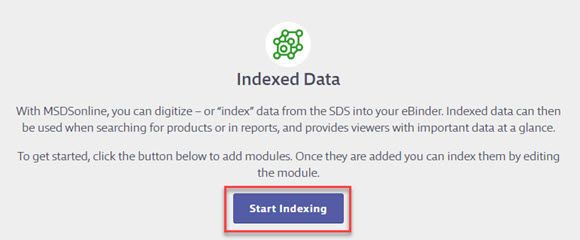
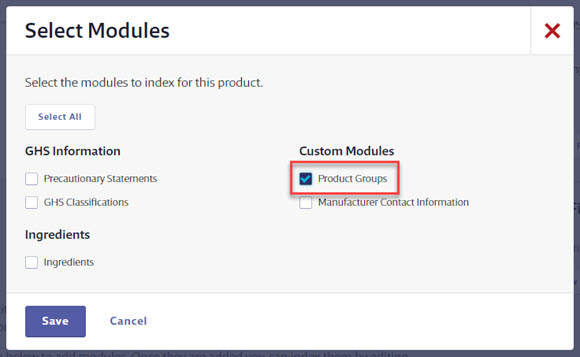
Once in the Product Summary, you may need to turn on the Product Groups data module. To do this, scroll down to the Indexed Data section and click Start Indexing. If you’ve already enabled any product summary indexing modules, this button will say Select Modules.
In the Select Modules window, select Product Groups and click Save.
The Product Groups data module is now available. Select Manage Product Groups to assign the product to a group.


By default, this data module will state “This module has not been indexed.” If you determine that this product does not need to be assigned to any groups, you can select No Product Groups apply to this product. Otherwise, select the checkbox for the group(s) to which you want to assign the product and click Save.
Note that you can also edit the product group information or add a new product group here. This is helpful if you realize that, while you have added some product groups, you still need to add the specific group for this particular product(s). You can add it here without going back to the Product Summary settings.

