

Working with Master Bowties
Some risk scenarios may be common across several different locations; however, manual duplication of risk assessments would require a significant amount of time and effort. “Master” bowties simplify this duplication process and help you standardize your bowtie creation across all locations. A well-established foundation of master bowties will ensure that each location is following the same risk analysis process with a minimum amount of effort and rework.
Master bowties act as templates that can be used to generate multiple identical or similar site risk scenarios. These site risk scenarios, displayed through site bowties, maintain the same top event but may have a varying number of causes and consequences sourced from the master bowtie.
For more information about site bowties, see Creating a Site Bowtie.
Master bowties are global items; they can be accessed and applied to a site risk scenario in any location in your Operational Risk system.

To access master bowtie functions, select Hazards & Risks > Master Bowties.
When viewing the list of master bowties, its best to think of them as a collection of templates. You can create new templates, edit existing ones, or even use existing bowties and turn them into templates themselves. These templates can then be used to create site bowties.
Creating a New Master Bowtie
At the top of the Master Bowties page, select the Add button and add Primary Details for the bowtie. This process is the same as when creating a normal ad-hoc bowtie; the major difference occurs after the standard bowtie has been created. When Primary Details are complete, select Save.
You’ll then see the new bowtie on the standard Bowties page with the type “Ad hoc Bowtie.” To open it, left-click the ellipsis icon (…) and select Open Bowtie.
Note: If you can’t find your bowtie, make sure you are in the correct section: Hazards & Risks > Bowties.
For more information about completing the bowtie, see Working with Bowties.
Once your bowtie is complete, you can convert it to a master bowtie.
Converting an Ad-Hoc Bowtie to a Master Bowtie
Select Hazards & Risks > Bowties and locate the bowtie you’d like to convert to a master bowtie. Left-click the ellipsis icon (…) and select Duplicate to…
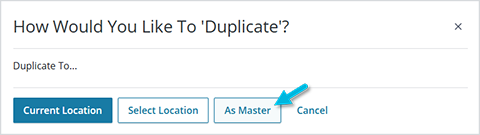
This provides the following three options; select As Master.
- Current Location – Create a simple copy to the existing location.
- Select Location – Create a copy in another location. Note that the bowtie will take on all security settings or permissions from the new location. As soon as you select the target location, the bowtie will copy; there is no confirmation message.
- As Master – Duplicate the ad-hoc bowtie and publish it as a master bowtie.
Note: Any future changes made to the original ad-hoc bowtie will not be reflected in the newly duplicated master bowtie.
Editing a Master Bowtie
At this point, your master bowtie has been created and is now active. You can duplicate it again, delete it, and modify its general information. You can also use it to create “site” bowties, which are location-specific bowties created from master bowtie templates.
But what if you’d like to make changes to a master bowtie after site bowties have already been created? Just select Hazards & Risks > Master Bowties and locate the master bowtie you’d like to modify. Left-click the ellipsis icon (…) and select Open Bowtie. Note that the bowtie is read-only. It may be helpful to use this page to review the master bowtie contents before creating a site bowtie.
To make changes, select the Viewing button on the toolbar > Edit Master Bowtie.
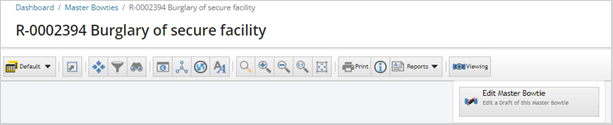
“Viewing” changes to ‘Editing”; if you’re ever unsure which mode you’re in, check the toolbar.
![]()
To stop editing the bowtie and exit without saving, select Editing > Discard Draft, or select Cancel.
Make your changes to the bowtie and select Editing when finished. This time, choose Publish Master Bowtie to open the Publish Changes “wizard.”
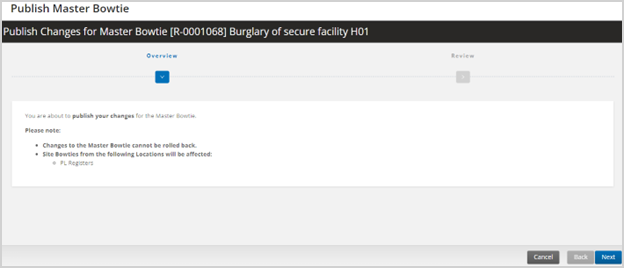
Before continuing:
- Review the site bowties that are affected by the changes implemented.
- Remember that the changes cannot be undone.
To apply the changes, select Next. Or, to close the wizard without saving your changes, select Cancel.

Add Review Details including:
- Reason – purpose for implementing changes to the master risk scenario (required)
- Team Leader – person facilitating or leading the review of the master risk scenario (required)
- Team Member – other participants in the review process who are users
- Other Participants – other participants in the review process who are not users, such as external consultants, vendors, and third-party contractors
- Session Date – date of the review session (default is the current date)
- Findings – any findings identified in the review session, which may include additional context justifying the changes
- Completed – date the review was completed/approved (default is the current date)
- Attachments – any supporting documentation, pictures, or other files
When the information is complete, select the Finish button to save the master bowtie.
