

User Management
Users, alongside groups within the ESuite platform, determine what locations and screens users can access. Users can be assigned directly to locations, or they can be assigned to them by membership in a group. Access to forms is granted by group membership.
Add a user
- From the ESuite Navigation Menu, select Admin > Security > Users Summary.
- From the toolbar, select New Record.
- Enter the user details; fields in red are required.
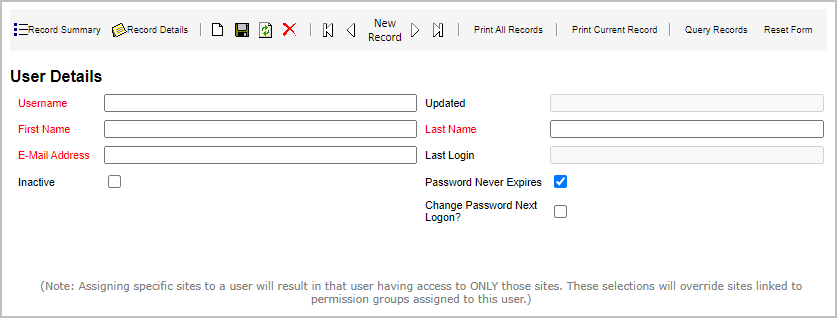
- Password Never Expires means the application will ignore the reset password time.
- Change Password Next Logon? This will force the user to change their password at the next login.
- Select Inactive to disable user access.
- Select the disc icon from the toolbar to save the new user. The application will notify you that a temporary password has been sent to the user.
Note: At this point, the user does not yet have security permissions.
Give a user access to forms
These steps describe how to add a user to a group, which grants access to forms within ESuite. This process may also grant access to locations depending on the group configuration.
Note: Form permissions accumulate, so if a user belongs to two groups, for example, the application will give users forms access from both groups.
- From the ESuite Navigation Menu, select Admin > Security > Users Summary.
- Find the user to whom you want to grant access and select Details.
- In the Groups section, select Add New Record.
- Select the Group Name to which you want to assign the user.
- Select Save to the left of the Group Name.
Assign locations to a user
- From the ESuite Navigation Menu, select Admin > Security > Users Summary.
- Find the user to whom you want to assign a location and select Details.
- In the Site Access section, select Add New Record.
- Select the Site ID for the location you want to assign to the user.
- Select Save to the left of the Site ID.
Reset your password
- On the login page, select Forgot your User ID and Password?
- Enter either your Username or Email.
- Select Reset Password.
- Follow the emailed instructions.
Reset a password for a user
You can reset a user’s password depending on the role that you have in the system.
- From the ESuite Navigation Menu, select Admin > Security > Users Summary.
- Find the user for whom you want to reset a password and select Details.
- In the Change Password section, enter a New Password, and then Re-type New Password.
- Select Set Password.
View a group’s current form access
Users get form access based on the forms assigned to their group(s). Follow these steps to view a group’s current form assignment.
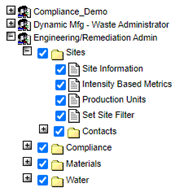
- From the ESuite Navigation Menu, select Admin > Security > Forms and Groups Access.
- Find the group you’re looking for and select the + to expand it. The assigned forms/folders have a blue checkmark.
Add a group
Groups are the only way to grant access to forms for users. In addition, based on configuration, a group can give location access to users.
- From the ESuite Navigation Menu, select Admin > Security > Groups Summary.
- From the toolbar, select New Record.
- Enter the group details; fields in red are required.

The Allow Access to All Sites? option gives all users of the group access to all locations in the application. This option is used in a limited way, for example, for guests who have ready-only permission, or for “main office” users who maintain all locations.
- Select the disc icon from the toolbar to save the new group.
Assign forms to a group
Users get form access based on forms assigned to their group. Follow these steps to assign forms to a group.
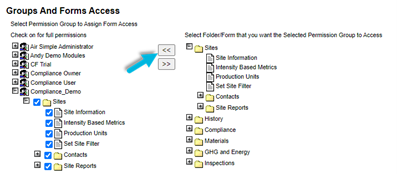
- From the ESuite Navigation Menu, select Admin > Security > Forms and Groups Access.
- Find the group to which you want to assign forms and select the + to expand it.
- Select the forms or grouping of forms (folder) on the right side of the page to assign them to the selected group. Note that when assigning a folder, all sub-items (forms and folders) are also included.
- Select the << button to assign the forms.
Note: The default permissions are read-write. To limit to read-only, deselect the check mark for a location.
Remove forms from a group
- From the ESuite Navigation Menu, select Admin > Security > Forms and Groups Access.
- Select the group from which you want to remove forms on the left side of the page.
- Select the >> button to remove the assigned forms.
Assign locations to a group
- From the ESuite Navigation Menu, select Admin > Security > Sites and Groups Access.

- In the Choose a Group dropdown, select the group to which you want to assign locations.
- Select Show Group.
- In the Corporate Hierarchy, select the location(s) to assign. Note that when assigning a folder, all sub-items (locations and folders) are also included.
- Select the << button to assign locations.
Notes:
- The default permissions are read-write. To limit to read-only, deselect the check mark for a location.
- Do not give permissions for the top level of the Corporate Hierarchy. If you need a group with access to all locations, see Add a group, above.
Remove locations from a group
- From the ESuite Navigation Menu, select Admin > Security > Sites and Groups Access.
- In the Choose a Group dropdown, select the group from which you want to remove locations.
- Select Show Group.
- In the Corporate Hierarchy, select the location(s) to remove. Note when removing a folder, all sub-items (locations and folders) are also included.
- Select the >> button to remove locations.
